Topic: Oracle Technical

DECODE 0

Decode function is more like an IF-ELSE-ELSIF-ENDIF kind of condition. The Decode function format has an expression and a search value to search for. If the expression matches with the search value, then a corresponding result is given back by the function.

The format of DECODE function is:

DECODE (expression, search value_1, result1,
search value_2, result2,
search value_3, result3,
….);

It means – the code will check if the result of the expression matches with the search value_1, then gives back result1 as the output, if the result of the expression matches with search value_2, then gives back result2 as the output and so on and so forth.

Example: In order to understand DECODE function, let’s first create the required data. Use the following statements to create table and insert data.

CREATE TABLE xx_decode_test
(
    emp_name     VARCHAR2 (200),
    emp_id       NUMBER,
    dept_id      NUMBER,
    join_date    DATE
);

SELECT * FROM XX_DECODE_TEST;

INSERT INTO xx_decode_test
     VALUES ('Adam Smith',
             101989,
             10,
             '10-JUN-10');

INSERT INTO xx_decode_test
     VALUES ('Jason Warne',
             101990,
             20,
             '10-AUG-09');

INSERT INTO xx_decode_test
     VALUES ('Glenn Symonds',
             101991,
             30,
             '11-SEP-11');

INSERT INTO xx_decode_test
     VALUES ('Ricky Manning',
             101992,
             40,
             '13-NOV-15');

INSERT INTO xx_decode_test
     VALUES ('Heath Flower',
             101993,
             50,
             '13-NOV-15');

INSERT INTO xx_decode_test
     VALUES ('George Brady',
             101994,
             10,
             '01-APR-03');

Once the table is created, run the following statement.

SELECT EMP_NAME,
       EMP_ID,
       DEPT_ID,
       DECODE (DEPT_ID,
               10, 'Marketing',
               20, 'Sales',
               30, 'Information Technology',
               40, 'Shipping')
           "Department Name"
  FROM xx_decode_test;

The query generates the following output.

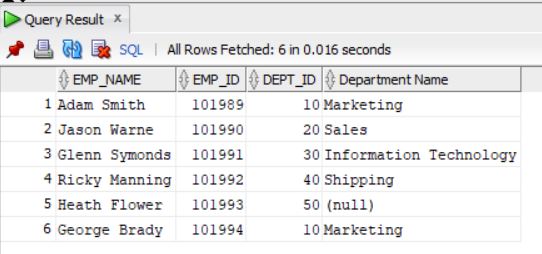
Thus, can be seen that, the query checks for the expression – if the value is 10, the function gives the word “Marketing”, if the value is 20, the function gives back “Sales” and etc..

Also, in the example above, it can be seen that no Department Name is assigned for Dept_ID 50. And thus, it returns a NULL Value.

Query to find Execution Method 0

The Execution_method_code field in the fnd_concurrent_programs table gives a single alphabet value that determines the Execution Method Code for that concurrent program type.

Note: In this example – taking the Executable Name of Autoinvoice Master Program i.e., RAXMTR

SELECT DECODE (execution_method_code,
               'X', 'FlexRpt',
               'F', 'FlexSql',
               'H', 'Host',
               'S', 'Immediate',
               'K', 'Java Concurrent Program',
               'J', 'Java Stored Procedure',
               'M', 'Multi Language Function',
               'P', 'Oracle Reports',
               'I', 'PL/SQL Stored Procedure',
               'E', 'Perl Concurrent Program',
               'B', 'Request Set Stage Function',
               'L', 'SQL*Loader',
               'Q', 'SQL*Plus',
               'R', 'SQL*Report',
               'Z', 'Shutdown Callback',
               'A', 'Spawned')
           Execution_Method
  FROM FND_EXECUTABLES
 WHERE executable_name = 'RAXMTR'; --- Concurrent Program Executable Name

The above query gives the Execution Method name for the Executable using the Execution_Method_code technically.

Also, these values are stored in the “CP_EXECUTION_METHOD_CODE” lookup. And can be derived using the query below.

SELECT lookup_code      Exection_method_code,
       meaning          execution_method,
       enabled_flag     Enabled_Flag
  FROM fnd_lookup_values
 WHERE LOOKUP_TYPE = 'CP_EXECUTION_METHOD_CODE' AND language = 'US'; 


INITCAP 0

INITCAP function returns a text expression, wherein it return the first letter of every  word in the string in UPPERCASE and all other letters in lowercase.

Example:

SELECT INITCAP ('oracle world is awesome') FROM DUAL;

Result: Oracle World Is Awesome

Example 2:

SELECT INITCAP (SUBSTR ('oracle world is awesome', 8)) FROM DUAL;

Result: World Is Awesome


INSTR 0

INSTR Function:

To understand INSTR function, it has 4 components in that function:

INSTR (String, sub-string, starting character position, occurrence of the character);

  • String: The string that is being used to search in.
  • Sub-String: The character or the group of characters that is being searched for.
  • Starting character position: The starting position from where the string has to be searched from
  • Occurence: The nth occurence of the Character or the group of characters.

For Example:

select instr ('test_element_is_titanium','t',1,3) from dual;

Here, in the string, we are trying to find the position of the 3rd occurence of the alphabet ‘t’ starting from the first position. Result: 12

Example 2:

select instr ('test_element_is_titanium','t',5,3) from dual;

Here, we are trying to find the position of the 3rd occurence of the alphabet ‘t’ starting from the 5th position. Result: 19

Example 3:

It is case sensitive.

select instr ('Test_Element_is_Titanium','t',1,1) from dual;

Here, we are trying to find the position of 1st occurence of the alphabet – lower case ‘t’ – starting from the 1st position. Result: 4

Example 4:

select instr ('test_element_is_titanium','t',1,8) from dual;

If the INSTR function is not able to find the occurence, then it results in zero (0). Since there is not 8th occurence of alphabet ‘t’ Result: 0

Real Life Usage: 

In real life, there may be a situation where we may have a string from which we are asked to retrieve the Customer Name (bolded alphabets in the string below).

String is: ‘12345678;Test_Customer_1;1234 Main Street;New York;94949;US’

The logic will be to identify the characters between the occurrence of the first semi-colon and the second semi-colon using INSTR and then using those positions in the substr function.

SELECT SUBSTR (
           '12345678;Test_Customer_1;1234 Main Street;New York;94949;US',
             INSTR (
                 '12345678;Test_Customer_1;1234 Main Street;New York;94949;US',
                 ';',
                 1,
                 1)
           + 1,
             INSTR (
                 '12345678;Test_Customer_1;1234 Main Street;New York;94949;US',
                 ';',
                 1,
                 2)
           - INSTR (
                 '12345678;Test_Customer_1;1234 Main Street;New York;94949;US',
                 ';',
                 1,
                 1)
           - 1)
  FROM DUAL;

Run the query above – Which gives the result as – Test_Customer_1 


SUBSTR 0

SUBSTR (Sub String) Functions are used to retrieve a portion of a given string. The Return value is a string of the same data type as the string.

General Usage: 

The format of SUBSTR function is: SUBSTR (String, Starting position, length).

  • String – The string from which we will be retrieving the result.
  • Starting position – Position from which we want to retrieve the result.
  • Length – Optional – The length of the string from the Starting Position.

Consider the below example:

select substr ('This is a test sentence', 16, 8) from dual;

Here:

  • String is – This is a test sentence
  • Starting Position – 16
  • Length – 8.

Thus, what the sql does is – it calculates the 16th position from the start, and retrieves the next 8 characters in the string. Which gives the result as “sentence”.

The Starting position can be negative too.

select substr ('This is a test sentence', -16, 8) from dual;

In the above scenario, the sql engine sees that the value is negative, and retrieves the 8 characters backward starting from the 16 position in the string. Which gives the result as “ a test ” (that may include the spaces).

Real World Use: In the real world, there may be a requirement where we have a string and we have to derive particular part of a string. In these scenarios, we can use SUBSTR. Consider a real world scenario, like below, a string with Customer Number, Name, Address, city, Zip and Country and delimited by a semi-colon. The string is:

  • 12345678;Test_Customer_1;1234 Main Street;New York;94949;US
  • 5678;Test_Customer_2;367 Parallel Street;California;38383;US

And the requirement is to derive the Customer Name.

The logic is to get the value between the First and Second semi-colons.

Using the Instr function – we get the position of the first semi-colon and the second semi-colon, and using SUBSTR, derive the values between the first and second semi-colon – which gives the Customer name. The below query is thus used:

SELECT SUBSTR (
           '12345678;Test_Customer_1;1234 Main Street;New York;94949;US',
             INSTR (
                 '12345678;Test_Customer_1;1234 Main Street;New York;94949;US',
                 ';',
                 1,
                 1)
           + 1,
             INSTR (
                 '12345678;Test_Customer_1;1234 Main Street;New York;94949;US',
                 ';',
                 1,
                 2)
           - INSTR (
                 '12345678;Test_Customer_1;1234 Main Street;New York;94949;US',
                 ';',
                 1,
                 1)
           - 1)
  FROM DUAL;

Run the query above – Which gives the result as – Test_Customer_1 (It may look a little tricky, but its simple when looked into).


DML Functions 0

DML (Data Manipulation Languages) Functions are used in day to day Oracle coding which would return a value when a corresponding action is triggered. They Initiate Action and Return a Value. Most of these DMS functions are standard text and calculation functions.

Some (not all of them are listed) of the very common DML functions that we use in Day to Day coding activities are below:

  • SUBSTR
  • INSTR

Create Table Scripts 0

Create Table script is one of the initial scripts to be learnt when learning PL/SQL. In this post, we shall look at the variations of creating a table script with few columns and data in it.

1: Basic CREATE Table. 

Syntax:  CREATE TABLE TABLE_NAME  (COLUMN_NAME_1 DATATYPE,  COLUMN_NAME_2 DATATYPE);

CREATE TABLE xx_test_table
(
    emp_id       NUMBER,
    emp_name     VARCHAR2 (200),
    join_date    DATE
);

INSERT INTO xx_test_table
     VALUES (1001, 'Shane Smith', '01-AUG-2001');

INSERT INTO xx_test_table
     VALUES (1002, 'Steve Warne', '02-AUG-2002');

SELECT * FROM xx_test_table;

Result:

2: Create Table with Default Value for columns. 

A default value can be provided for columns in a table in case a value is not provided in the Insert statement. In that scenario, the default value is populated in that column.

CREATE TABLE xx_test_table
(
    emp_id       NUMBER (6, 2),
    emp_name     VARCHAR2 (200) DEFAULT 'John Doe',
    join_date    DATE
);

INSERT INTO xx_test_table
     VALUES (1001, 'Shane Smith', '01-AUG-2001');

INSERT INTO xx_test_table
     VALUES (1002, 'Steve Warne', '02-AUG-2002');

INSERT INTO xx_test_table (emp_id, join_date)
     VALUES (1003, '02-AUG-2002');


SELECT * FROM xx_test_table;

Result:

3. NOT NULL on a column

During creation of a table, it can be mentioned that a particular column cannot have NULL values in it. In the example below, the column Join_date has a NOT NULL condition on it.

CREATE TABLE xx_test_table
(
    emp_id       NUMBER (6, 2),
    emp_name     VARCHAR2 (200) DEFAULT 'John Doe',
    join_date    DATE NOT NULL
);

INSERT INTO xx_test_table
     VALUES (1001, 'Shane Smith', '01-AUG-2001');

INSERT INTO xx_test_table
     VALUES (1002, 'Steve Warne', '02-AUG-2002');

INSERT INTO xx_test_table (emp_id, join_date)
     VALUES (1003, '02-AUG-2002');

INSERT INTO xx_test_table
     VALUES (1004, 'Mike Hannigan', NULL);

Thus, in the last line, when we try to insert a NULL value in to the Join_date column, we get the following error message.

ORA-01400: cannot insert NULL into (“APPS”.”XX_TEST_TABLE”.”JOIN_DATE”)”

4. Defining Constraints on Columns

A constraint is an optional clause while creating a table. A constraint is a rule according to which the data is loaded into that table. A constraint can be defined on column level as well as at table level.

Usually the constraints follow the following naming standards: <tablename>_<column_name>_<constraint_abbreviation>

Column Level Constraints: These constraints refer to a single column on the table and do not specify a column name.

  • Primary Key: Indicates that data in each row of the column can be identified uniquely using this primary key. The identified column must be defined as NOT NULL. In the example below, the emp_id column is being assigned as a Primary Key.
CREATE TABLE xx_test_table
(
    emp_id       NUMBER (6, 2) NOT NULL CONSTRAINT xx_test_emp_id_PK PRIMARY KEY,
    emp_name     VARCHAR2 (200) DEFAULT 'John Doe',
    join_date    DATE NOT NULL
);

INSERT INTO xx_test_table
     VALUES (1001, 'Shane Smith', '01-AUG-2001');

INSERT INTO xx_test_table
     VALUES (1002, 'Steve Warne', '02-AUG-2002');

INSERT INTO xx_test_table (emp_id, join_date)
     VALUES (1003, '02-AUG-2002');

INSERT INTO xx_test_table
     VALUES (1001, 'Mike Hannigan', '01-SEP-2002');

Thus, when a duplicate value is being inserted in the 4th line, a Primary Key Violation is being thrown.

  • Unique: Indicates that the values in the column must be unique. In the example below, the emp_id column has a Unique constraint on it.
CREATE TABLE xx_test_table
(
    emp_id       NUMBER (6, 2) CONSTRAINT xx_test_emp_id_UQ UNIQUE,
    emp_name     VARCHAR2 (200) DEFAULT 'John Doe',
    join_date    DATE NOT NULL
);

INSERT INTO xx_test_table
     VALUES (1001, 'Shane Smith', '01-AUG-2001');

INSERT INTO xx_test_table
     VALUES (1002, 'Steve Warne', '02-AUG-2002');

INSERT INTO xx_test_table (emp_id, join_date)
     VALUES (1003, '02-AUG-2002');

INSERT INTO xx_test_table
     VALUES (1001, 'Mike Hannigan', '01-SEP-2002');

Thus, when we try to insert a value of 1001 into emp_id, when the value already exists, then the command throws an error.

  • CHECK: The CHECK constraint specifies certain rules for the data in the column according to which the user likes the data to be. In the example below, the CHECK constraint makes sure that the Salary is always above 5000.
CREATE TABLE xx_test_table
(
    emp_id       NUMBER (6, 2),
    emp_name     VARCHAR2 (200) DEFAULT 'John Doe',
    join_date    DATE NOT NULL, 
    salary       NUMBER (8,2) CONSTRAINT sal_chk CHECK (salary > 5000)
);

INSERT INTO xx_test_table
     VALUES (1001, 'Shane Smith', '01-AUG-2001', 8500);

INSERT INTO xx_test_table
     VALUES (1002, 'Steve Warne', '02-AUG-2002', 7200);

INSERT INTO xx_test_table
     VALUES (1001, 'Mike Hannigan', '01-SEP-2002', 4800);

Thus, when we try to insert the third line above, with a salary of 4800 (less than 5000), the insert command throws an error.


Cursors – Implicit Cursors 0

What are Cursors? 

A cursor is a pointer to a private SQL area, temporarily allocated in the session’s User Global Area (UGA), that stores information about the processing of a SELECT statement or a DML statement (Insert, Update or Delete). In layman terms, a Cursor is used to fetch (SELECT) a particular dataset from a much larger dataset which can then be used for data manipulation using other DML Operations like Insert, Update or Delete.

There are two types of Cursors: Implicit Cursors and Explicit Cursors.

In this post, we will discuss mainly about Implicit Cursors.

Implicit Cursors: Whenever you execute a simple SELECT statement or a DML Statement like INSERT, UPDATE or DELETE statement, Oracle database creates an implicit cursor to process these statements. In such scenarios, Oracle opens a Cursor, fetches the row and then closes the Cursor after completing the sql operation. In Implicit cursors, the cursor life cycle is maintained by the Oracle Database.

Consider the following example. Create a table called xx_test_cursor and insert 4 records into that table. (below code).

CREATE TABLE xx_test_cursor
(
    emp_name         VARCHAR2 (200),
    emp_id           NUMBER,
    emp_join_date    DATE,
    manager_name     VARCHAR2 (200)
);

INSERT INTO xx_test_cursor
     VALUES ('John',1001,SYSDATE - 30, 'Frank');

INSERT INTO xx_test_cursor
     VALUES ('Graeme', 1002, SYSDATE - 40, 'Frank');

INSERT INTO xx_test_cursor
     VALUES ('Shawn', 1003, SYSDATE - 50, 'Frank');

INSERT INTO xx_test_cursor
     VALUES ('Jonty', 1004, SYSDATE - 60, 'Frank');

COMMIT;
SELECT * FROM xx_test_cursor;

The select statement gives below result:

A sample example of an implicit cursor: SELECT INTO

DECLARE
    l_emp_name    xx_test_imp_cursor.emp_name%TYPE;
    l_join_date   xx_test_imp_cursor.emp_join_date%TYPE;
BEGIN
    SELECT emp_name, emp_join_date
      INTO l_emp_name, l_join_date
      FROM xx_test_imp_cursor
     WHERE manager_name = 'Frank' 
       AND emp_id = 1001;

    DBMS_OUTPUT.put_line (
           'Emp Name is: '
        || l_emp_name
        || ' and Emp Join Date is: '
        || l_join_date);
EXCEPTION
    WHEN OTHERS
    THEN
        DBMS_OUTPUT.put_line ('Exception during fetching data: ' || SQLERRM);
END;

This gives the following result:

But, if the SELECT statement fetches more than 1 row in the dataset, then the program ends in exception. (in the code below I have commented the emp_id = 1001)

DECLARE
    l_emp_name    xx_test_cursor.emp_name%TYPE;
    l_join_date   xx_test_cursor.emp_join_date%TYPE;
BEGIN
    SELECT emp_name, emp_join_date
      INTO l_emp_name, l_join_date
      FROM xx_test_cursor
     WHERE manager_name = 'Frank';

    DBMS_OUTPUT.put_line (
           'Emp Name is: '
        || l_emp_name
        || ' and Emp Join Date is: '
        || l_join_date);
EXCEPTION
    WHEN OTHERS
    THEN
        DBMS_OUTPUT.put_line ('Exception during fetching data: ' || SQLERRM);
END;

And since this Select statement fetches more than 1 row, the code throws the following error:

Note: Actually Implicit Cursors are faster to process than an explicit cursor because there isn’t a separate step that declares, opens, fetches and closes the cursor.

Attributes of an Implicit Cursor:  There are 4 important attributes of an Implicit Cursor:

  • %FOUND – Until a DML statement like Insert, Update or Delete affects one or more rows, the SQL%FOUND will result as NULL The example below tries to update a record in the xx_test_cursor table. Only if the Update statement affects one or more rows, then the next statement in the IF condition is executed:
DECLARE
BEGIN
    UPDATE xx_test_cursor
       SET emp_name = emp_name || '_new'
     WHERE emp_id = 1001;

    IF SQL%FOUND
    THEN
        DBMS_OUTPUT.put_line ('SQL Found is True, thus executing the following statement..');
        INSERT INTO XX_TEST_CURSOR
             VALUES ('DARELL',
                     1005,
                     SYSDATE - 60,
                     'Frank');
        COMMIT;              
    END IF;
    
EXCEPTION
    WHEN OTHERS
    THEN
        DBMS_OUTPUT.put_line ('Exception when processing data: ' || SQLERRM);
END;
  • %ISOPEN – For Implicit Cursors, the database automatically closes the Cursor after executing the operation. Thus, the %ISOPEN always yields a FALSE for Implicit Cursors (because the Cursor is already closed). It is more useful for Explicit Cursors.
  • %NOTFOUND – %NOTFOUND is opposite to the %FOUND attribute. This attribute checks if the corresponding DML Operation like Insert, Update or Delete modified any data in the table. If the SQL code did not update / insert / delete any data, then this attribute returns TRUE. Else if the SQL modifies any data, then it returns FALSE.
    • In the example below – the UPDATE statement tries to update the table for a record that does not exist. Thus, no data was modified and the %NOTFOUND is true. And accordingly, the later INSERT statement works.
DECLARE
BEGIN
    UPDATE xx_test_cursor
       SET emp_name = emp_name || '_new'
     WHERE emp_id = 2006;

    IF SQL%NOTFOUND
    THEN
        DBMS_OUTPUT.put_line ('SQL%NOTFOUND is True, thus executing the following statement..');
        INSERT INTO XX_TEST_CURSOR
             VALUES ('SCOTT',
                     1006,
                     SYSDATE - 60,
                     'Frank');
        COMMIT;              
    END IF;
    
EXCEPTION
    WHEN OTHERS
    THEN
        DBMS_OUTPUT.put_line ('Exception when processing data: ' || SQLERRM);
END;
  • %ROWCOUNT – The %ROWCOUNT attribute returns the total number of records that got affected by the DML Operation.
    • For example – in the code below – the test table has 1 record with emp_id = 1006. Thus, the delete statement deletes 1 record and the displays the same in the dbms_output.
DECLARE
BEGIN
    DELETE FROM xx_test_cursor
          WHERE emp_id = 1006;

    DBMS_OUTPUT.put_line ('Total Number of rows deleted: ' || SQL%ROWCOUNT);
    
EXCEPTION
    WHEN OTHERS
    THEN
        DBMS_OUTPUT.put_line ('Exception when processing data: ' || SQLERRM);
END;

And the corresponding dbms_output displays as below:

Oracle Triggers 0

What are Triggers in Oracle? 

Oracle Triggers are similar to PL/SQL Stored procedures that can be stored in the database and are explicitly fired whenever a table or a view is changed by a user action or a database system actions occur.

A trigger can be fired when one of the following happens on a table:

DML (Data Manipulation Language) statements like  ‘Insert“, “Update” or “Delete” are run against the table.

DDL (Data Definition Language) statements like “Create“, “Alter” or “Drop” are issued either by a particular schema / user in the database.

Note: Using Triggers is effective to modify objects in the database, but they have to be used carefully. Excessive use of triggers may cause a SQL statement inside that trigger to fire other triggers – calling an effect called Cascading Triggers.

Parts of a Trigger: 

  • Triggering statement: A triggering statement is the SQL Statement or database event that causes a trigger to fire.
  • Triggering Restriction: A trigger restriction results in a Boolean expression i.e. either a true or a false that specifies whether the trigger should fire or not. A trigger fires if the Triggering restriction results in “True“. A “False” or an “Unknown” result doesn’t fire a trigger.
  • Trigger Action: A trigger action is the pl/sql statement (or anonymous block of code) that runs when the Triggering restriction results as True.

Example:

The following code is an example of a trigger that insert an Audit record into Table2 whenever an Insert event occurs into Table1.

Step 1: Create Table1 and Table2 for this test case.

CREATE TABLE table1
(
    col1    NUMBER
);

CREATE TABLE table2
(
    col1    DATE,
    col2    VARCHAR2 (2000)
);

Step 2: Create Trigger script.

CREATE TRIGGER tab1_trig
    AFTER INSERT
    ON table1
BEGIN
    INSERT INTO table2
         VALUES (SYSDATE, 'Insert into table1');
EXCEPTION WHEN OTHERS 
THEN 
   DBMS_OUTPUT.PUT_LINE ('Error During Trigger creation: )'||SQLERRM);
END;

Step 3: Generate the Triggering event.

INSERT INTO table1
     VALUES (1);

Step 4: Check the data in the Table 2.

SELECT * FROM table2;

Step 5: Result

Explanation: 

In the example above:

  • The Triggering statement is: AFTER INSERT ON table1.

The trigger fires immediately after an insert operation occurs on the Table1.

  • The Triggering Action is to Insert values in the Table2 when an Insert happens on Table1.

Different Types of Triggers

  • Row Triggers:
  • Statement Triggers:
  • BEFORE and AFTER Triggers:
  • INSTEAD OF Triggers:


How to delete a Value from a Valueset 0

Sometimes we create values inside valuesets that we may not need during code migration. As a developer, we might want to delete that value from that valueset during development, that way we are not migrating unnecessary information to higher instances.

Let’s create a test value set.

And create a couple of test values to the valueset.

SQL code to derive the values of the valueset from backend:

select * 
from fnd_flex_values
where flex_value_set_id = (select flex_value_set_id from fnd_flex_value_sets
where flex_value_set_name = 'XX_TEST_VALUESET');

Now, below is the code to delete value from the valueset:

declare 

l_flex_value_id  fnd_flex_values.flex_value_id%TYPE; 
l_flex_value     fnd_flex_values.flex_value%TYPE;

begin 

SELECT ffv.flex_value_id, ffv.flex_value
INTO   l_flex_value_id, l_flex_value
        FROM fnd_flex_value_sets ffvs,
             fnd_flex_values ffv,
             fnd_flex_values_tl ffvt
       WHERE     flex_value_set_name = 'XX_TEST_VALUESET' -- Value Set Name
             AND ffv.flex_value_set_id = ffvs.flex_value_set_id
             AND ffvt.flex_value_id = ffv.flex_value_id
             AND ffvs.flex_value_set_id = ffv.flex_value_set_id
             AND ffvt.language = 'US'
             AND ffv.enabled_flag = 'Y'
             AND ffv.summary_flag = 'N'
             and flex_value = 'Test Value 2';
             
      dbms_output.put_line ('l_flex_value_id is: '||l_flex_value_id||' and l_flex_value is :'||l_flex_value);

      fnd_flex_values_pkg.delete_row (l_flex_value_id);
      COMMIT;
      
      dbms_output.put_line (l_flex_value||' value deleted succesfully...');
                   
exception when others
then 

dbms_output.put_line ('Error during execution: '||SQLERRM); 

end;

Valueset after the script is run:

Note: Make sure this script is used only in a development instance and not in any controlled instances. APPS access is required to run the above script. Please use it carefully.