Posts By: Phani Adivi
Warning: count(): Parameter must be an array or an object that implements Countable in /var/www/wp-content/themes/WpPremium/author.php on line 78
Update Customer Profile at Account Level using SOAP Webservice – Oracle Fusion
There are situations when Customer Accounts are created without Profile (Profile History tab) at the Account level in Oracle Fusion Application.
The following webservice can be used to create the Profile History.
SOAP WSDL: https://<yourservername>.oraclecloud.com/fscmService/ReceivablesCustomerProfileService?WSDL
Run the following query to get the following details that you will be using in the payload.
select cust_account_id, account_number, party_id
from hz_cust_accounts
where account_number = p_account_number;
Payload:
<soapenv:Envelope xmlns:soapenv="http://schemas.xmlsoap.org/soap/envelope/" xmlns:typ="http://xmlns.oracle.com/apps/financials/receivables/customers/customerProfileService/types/" xmlns:cus="http://xmlns.oracle.com/apps/financials/receivables/customers/customerProfileService/" xmlns:cus1="http://xmlns.oracle.com/apps/financials/receivables/customerSetup/customerProfiles/model/flex/CustomerProfileDff/" xmlns:cus2="http://xmlns.oracle.com/apps/financials/receivables/customerSetup/customerProfiles/model/flex/CustomerProfileGdf/">
   <soapenv:Header/>
   <soapenv:Body>
      <typ:createCustomerProfile>
         <typ:customerProfile>
            <cus:AccountNumber>999123001</cus:AccountNumber>
            <cus:CustomerAccountId>300000029861098</cus:CustomerAccountId>
            <cus:ProfileClassName>DEFAULT</cus:ProfileClassName>
            <cus:CreditChecking>Y</cus:CreditChecking>
            <cus:CreditHold>N</cus:CreditHold>
            <cus:DiscountTerms>Y</cus:DiscountTerms>
            <cus:DunningLetters>N</cus:DunningLetters>
            <cus:EffectiveEndDate>2030-01-10</cus:EffectiveEndDate>
            <cus:EffectiveStartDate>2022-01-09</cus:EffectiveStartDate>
            <cus:OverrideTerms>Y</cus:OverrideTerms>
            <cus:PartyId>300000029829602</cus:PartyId>
         </typ:customerProfile>
      </typ:createCustomerProfile>
   </soapenv:Body>
</soapenv:Envelope>
If you get the response payload, then the profile history is created.
Warning: count(): Parameter must be an array or an object that implements Countable in /var/www/wp-content/themes/WpPremium/author.php on line 78
Adding an Email at Customer Contact Point using Webservice – Oracle Fusion
In the previous Post, we learnt how to create a Customer Contact Point for a Customer Account. In this post, we will look at the payload and process to assign or add an email to a Contact Point.
Like in the previous post, get the Party ID of the Contact and the RelationshipId between the Customer Account and the Customer Contact Point.
WSDL: https://<yourservername>.oraclecloud.com/crmService/FoundationPartiesPersonService?WSDL
Payload:
<soapenv:Envelope xmlns:soapenv="http://schemas.xmlsoap.org/soap/envelope/" xmlns:typ="http://xmlns.oracle.com/apps/cdm/foundation/parties/personService/applicationModule/types/" xmlns:per="http://xmlns.oracle.com/apps/cdm/foundation/parties/personService/" xmlns:par="http://xmlns.oracle.com/apps/cdm/foundation/parties/partyService/" xmlns:sour="http://xmlns.oracle.com/apps/cdm/foundation/parties/flex/sourceSystemRef/" xmlns:con="http://xmlns.oracle.com/apps/cdm/foundation/parties/contactPointService/" xmlns:con1="http://xmlns.oracle.com/apps/cdm/foundation/parties/flex/contactPoint/" xmlns:par1="http://xmlns.oracle.com/apps/cdm/foundation/parties/flex/partySite/" xmlns:per1="http://xmlns.oracle.com/apps/cdm/foundation/parties/flex/person/" xmlns:rel="http://xmlns.oracle.com/apps/cdm/foundation/parties/relationshipService/" xmlns:org="http://xmlns.oracle.com/apps/cdm/foundation/parties/flex/orgContact/" xmlns:rel1="http://xmlns.oracle.com/apps/cdm/foundation/parties/flex/relationship/">
   <soapenv:Header/>
   <soapenv:Body>
      <typ:mergePerson>
         <typ:personParty>
            <!--PartyId of the Person/Contact-->
            <per:PartyId>3000000281613</per:PartyId>
            <per:Relationship>
               <!--RelationshipId created in the first request-->
               <rel:RelationshipId>3000000281613</rel:RelationshipId>
               <rel:Email>
                  <con:OwnerTableName>HZ_PARTIES</con:OwnerTableName>
                  <con:CreatedByModule>HZ_WS</con:CreatedByModule>
                  <con:ContactPointPurpose>BUSINESS</con:ContactPointPurpose>
                  <con:StartDate>2021-08-16</con:StartDate>
                  <!--EmailAddress of the Person/Contact-->
                  <con:EmailAddress>[email protected]</con:EmailAddress>
               </rel:Email>
            </per:Relationship>
         </typ:personParty>
      </typ:mergePerson>
   </soapenv:Body>
</soapenv:Envelope>Warning: count(): Parameter must be an array or an object that implements Countable in /var/www/wp-content/themes/WpPremium/author.php on line 78
Create Customer Contact Point at Account Level using SOAP Webservice- Oracle Fusion
In the last Post, we have seen ways to create Customer Account and Customer Account Site using SOAP Webservices. In this post, we shall try to continue to use SOAP Webservices to create Customer Contact Point at Account level.
One thing we have to understand is that – a Contact Point is also an object in the TCA Architecture and thus, the Contact will also have a Party ID.
It took some time for me to get to this stage to understand the actual process to create a contact, and wanted to share. In short, we will follow the below steps:
- Create a Contact -> This will create a Party ID for the Contact Point.
- Take the Party ID of the Contact from the above step, and take the Party ID of the Customer Account to which we are trying to create the Contact Point for.
- Create a Relationship between the two Parties. Get the RelationshipId.
- Take the RelationshipId from the above step, take the Customer Account ID, and run the SOAP to create the Customer Contact Point.
Explained in detail below:
Step 1: Create Contact Point: First, we create a Person or Party for the Contact using the Payload below.
WSDL: https://<yourservername>.oraclecloud.com/crmService/FoundationPartiesPersonService?WSDL
Payload:
<soapenv:Envelope xmlns:soapenv="http://schemas.xmlsoap.org/soap/envelope/" xmlns:typ="http://xmlns.oracle.com/apps/cdm/foundation/parties/personService/applicationModule/types/" xmlns:per="http://xmlns.oracle.com/apps/cdm/foundation/parties/personService/" xmlns:par="http://xmlns.oracle.com/apps/cdm/foundation/parties/partyService/" xmlns:sour="http://xmlns.oracle.com/apps/cdm/foundation/parties/flex/sourceSystemRef/" xmlns:con="http://xmlns.oracle.com/apps/cdm/foundation/parties/contactPointService/" xmlns:con1="http://xmlns.oracle.com/apps/cdm/foundation/parties/flex/contactPoint/" xmlns:par1="http://xmlns.oracle.com/apps/cdm/foundation/parties/flex/partySite/" xmlns:per1="http://xmlns.oracle.com/apps/cdm/foundation/parties/flex/person/" xmlns:rel="http://xmlns.oracle.com/apps/cdm/foundation/parties/relationshipService/" xmlns:org="http://xmlns.oracle.com/apps/cdm/foundation/parties/flex/orgContact/" xmlns:rel1="http://xmlns.oracle.com/apps/cdm/foundation/parties/flex/relationship/">
   <soapenv:Header/>
   <soapenv:Body>
      <typ:createPerson>
         <typ:personParty>
            <per:CreatedByModule>HZ_WS</per:CreatedByModule>
            <per:PersonProfile>
               <per:CreatedByModule>HZ_WS</per:CreatedByModule>
               <per:PersonFirstName>Test Contact</per:PersonFirstName>
               <per:PersonLastName>soap</per:PersonLastName>
            </per:PersonProfile>
            <per:PartyUsageAssignment>
               <par:PartyUsageCode>CONTACT</par:PartyUsageCode>
               <par:CreatedByModule>HZ_WS</par:CreatedByModule>
            </per:PartyUsageAssignment>
            <per:Phone>
               <con:OwnerTableName>HZ_PARTIES</con:OwnerTableName>
               <con:PhoneCountryCode>1</con:PhoneCountryCode>
               <con:PhoneNumber>987-654-3210</con:PhoneNumber>
               <con:PhoneLineType>GEN</con:PhoneLineType>
               <con:CreatedByModule>HZ_WS</con:CreatedByModule>
            </per:Phone>
            <per:Phone>
               <con:OwnerTableName>HZ_PARTIES</con:OwnerTableName>
               <con:PhoneCountryCode>1</con:PhoneCountryCode>
               <con:PhoneNumber>987-654-3212</con:PhoneNumber>
               <con:PhoneLineType>MOBILE</con:PhoneLineType>
               <con:CreatedByModule>HZ_WS</con:CreatedByModule>
            </per:Phone>
         </typ:personParty>
      </typ:createPerson>
   </soapenv:Body>
</soapenv:Envelope>
After you run the payload, Copy the Party ID from the Response. Party ID = 300000030003058. This is the party ID of the Contact Point.
Step 2: Establishing a Relationship between the above created Contact and the Customer Account
First get the Party ID of the Customer to which this Contact Point is being assigned to using the following query:
select party_id from hz_cust_accounts where account_number = <account_number> --> party_id = 100000001814997WSDL: https://<yourservername>.oraclecloud.com/crmService/FoundationPartiesPersonService?WSDL
Payload:
<soapenv:Envelope xmlns:soapenv="http://schemas.xmlsoap.org/soap/envelope/" xmlns:typ="http://xmlns.oracle.com/apps/cdm/foundation/parties/personService/applicationModule/types/" xmlns:per="http://xmlns.oracle.com/apps/cdm/foundation/parties/personService/" xmlns:par="http://xmlns.oracle.com/apps/cdm/foundation/parties/partyService/" xmlns:sour="http://xmlns.oracle.com/apps/cdm/foundation/parties/flex/sourceSystemRef/" xmlns:con="http://xmlns.oracle.com/apps/cdm/foundation/parties/contactPointService/" xmlns:con1="http://xmlns.oracle.com/apps/cdm/foundation/parties/flex/contactPoint/" xmlns:par1="http://xmlns.oracle.com/apps/cdm/foundation/parties/flex/partySite/" xmlns:per1="http://xmlns.oracle.com/apps/cdm/foundation/parties/flex/person/" xmlns:rel="http://xmlns.oracle.com/apps/cdm/foundation/parties/relationshipService/" xmlns:org="http://xmlns.oracle.com/apps/cdm/foundation/parties/flex/orgContact/" xmlns:rel1="http://xmlns.oracle.com/apps/cdm/foundation/parties/flex/relationship/">
   <soapenv:Header/>
   <soapenv:Body>
      <typ:mergePerson>
         <typ:personParty>
            <!--PartyId of the Person/Contact-->
            <per:PartyId>300000030003058</per:PartyId>
            <per:Relationship>
               <rel:SubjectType>PERSON</rel:SubjectType>
               <rel:SubjectTableName>HZ_PARTIES</rel:SubjectTableName>
               <!--PartyId of the Organization/Customer to which this Contact is being assigned to-->
               <rel:ObjectId>100000001814997</rel:ObjectId>
               <rel:ObjectType>ORGANIZATION</rel:ObjectType>
               <rel:ObjectTableName>HZ_PARTIES</rel:ObjectTableName>
               <rel:RelationshipCode>CONTACT_OF</rel:RelationshipCode>
               <rel:RelationshipType>CONTACT</rel:RelationshipType>
               <rel:CreatedByModule>HZ_WS</rel:CreatedByModule>
               <rel:OrganizationContact>
                  <rel:CreatedByModule>HZ_WS</rel:CreatedByModule>
                  <rel:PrimaryCustomerFlag>true</rel:PrimaryCustomerFlag>
               </rel:OrganizationContact>
            </per:Relationship>
         </typ:personParty>
      </typ:mergePerson>
   </soapenv:Body>
</soapenv:Envelope>
From the response – copy the RelationshipId. 3000000300495. This is the RelationshipID. This establishes a relation between the Contact Party ID and the Account Party ID.
Step3: Until now – we have created a Contact (above step1). And have established a Relationship between the Customer and Contact. Now we have to assign the Contact to the Account.
Get the Cust account Id of the customer using the query below
select cust_account_id from hz_cust_accounts where account_number = <account_number> –> cust_account_id = 1000000018717
WSDL: https://<yourservername>oraclecloud.com/crmService/CustomerAccountService?WSDL
<soapenv:Envelope xmlns:soapenv="http://schemas.xmlsoap.org/soap/envelope/" xmlns:typ="http://xmlns.oracle.com/apps/cdm/foundation/parties/customerAccountService/applicationModule/types/" xmlns:cus="http://xmlns.oracle.com/apps/cdm/foundation/parties/customerAccountService/" xmlns:cus1="http://xmlns.oracle.com/apps/cdm/foundation/parties/flex/custAccountContactRole/" xmlns:par="http://xmlns.oracle.com/apps/cdm/foundation/parties/partyService/" xmlns:sour="http://xmlns.oracle.com/apps/cdm/foundation/parties/flex/sourceSystemRef/" xmlns:cus2="http://xmlns.oracle.com/apps/cdm/foundation/parties/flex/custAccountContact/" xmlns:cus3="http://xmlns.oracle.com/apps/cdm/foundation/parties/flex/custAccountRel/" xmlns:cus4="http://xmlns.oracle.com/apps/cdm/foundation/parties/flex/custAccountSiteUse/" xmlns:cus5="http://xmlns.oracle.com/apps/cdm/foundation/parties/flex/custAccountSite/" xmlns:cus6="http://xmlns.oracle.com/apps/cdm/foundation/parties/flex/custAccount/">
   <soapenv:Header/>
   <soapenv:Body>
      <typ:mergeCustomerAccount>
         <typ:customerAccount>
            <!--CustomerAccountId for the Customer Account-->
            <cus:CustomerAccountId>1000000018717</cus:CustomerAccountId>
            <cus:CustomerAccountContact>
               <!--CustomerAccountId for the Customer Account-->
               <cus:CustomerAccountId>1000000018717</cus:CustomerAccountId>
               <cus:RoleType>CONTACT</cus:RoleType>
               <cus:CreatedByModule>HZ_WS</cus:CreatedByModule>
               <!--RelationshipId created in the first request-->
               <cus:RelationshipId>3000000300495</cus:RelationshipId>
            </cus:CustomerAccountContact>
         </typ:customerAccount>
      </typ:mergeCustomerAccount>
   </soapenv:Body>
</soapenv:Envelope>
Check the response of the webservice, and the Customer Account should have got created at the Customer Account level.
The same Customer Contact Point can also be created at the Customer Account Site Level. It needs an extra payload.
Warning: count(): Parameter must be an array or an object that implements Countable in /var/www/wp-content/themes/WpPremium/author.php on line 78
Create Customer Account, Site, Site Use using SOAP Webservice – Oracle Fusion
In the previous post, we have used REST API to create a Customer Organization that would create Party, Party Site, Party Site Usage and Location for an Organization. That post can be found here: https://oraclelabs.phaniadivi.com/2022/01/creating-a-party-or-organization-using-rest-api-oracle-fusion/
Note: An Organization / Party can be created using a REST API and a Customer account and Sites are created using SOAP Webservices.
In this Post, we will use a SOAP webservice to create Customer for an existing Party.
Of the Existing Party – Get the Party ID, Party Site ID from the BI Catalog by running the following queries:
select party_id from hz_parties where party_name = 'Oracle Learnings';

select party_site_id
from hz_party_sites
where party_id = (select party_id from hz_parties where party_name = 'Oracle Learning')
Using SOAP UI or other application run the following code:
WSDL: https://ehkm-test.fa.us6.oraclecloud.com/crmService/CustomerAccountService?WSDL
Payload:
<soapenv:Envelope xmlns:soapenv="http://schemas.xmlsoap.org/soap/envelope/" xmlns:typ="http://xmlns.oracle.com/apps/cdm/foundation/parties/customerAccountService/applicationModule/types/" xmlns:cus="http://xmlns.oracle.com/apps/cdm/foundation/parties/customerAccountService/" xmlns:cus1="http://xmlns.oracle.com/apps/cdm/foundation/parties/flex/custAccountContactRole/" xmlns:par="http://xmlns.oracle.com/apps/cdm/foundation/parties/partyService/" xmlns:sour="http://xmlns.oracle.com/apps/cdm/foundation/parties/flex/sourceSystemRef/" xmlns:cus2="http://xmlns.oracle.com/apps/cdm/foundation/parties/flex/custAccountContact/" xmlns:cus3="http://xmlns.oracle.com/apps/cdm/foundation/parties/flex/custAccountRel/" xmlns:cus4="http://xmlns.oracle.com/apps/cdm/foundation/parties/flex/custAccountSiteUse/" xmlns:cus5="http://xmlns.oracle.com/apps/cdm/foundation/parties/flex/custAccountSite/" xmlns:cus6="http://xmlns.oracle.com/apps/cdm/foundation/parties/flex/custAccount/">
   <soapenv:Header/>
   <soapenv:Body>
      <typ:createCustomerAccount>
         <typ:customerAccount>
            <cus:PartyId>-- enter party id</cus:PartyId>
            <cus:AccountName>Customer Account Name</cus:AccountName>
            <cus:AccountNumber>123456</cus:AccountNumber>
            <cus:CustomerType>R</cus:CustomerType>
            <cus:AccountEstablishedDate>2022-01-09</cus:AccountEstablishedDate>
            <cus:CreatedByModule>HZ_WS</cus:CreatedByModule>
            <cus:CustomerAccountSite>
               <cus:PartySiteId>-- enter party site id --</cus:PartySiteId>
               <cus:CreatedByModule>HZ_WS</cus:CreatedByModule>
               <cus:SetId>-- derive set id from configurations --</cus:SetId>
               <cus:StartDate>2022-01-09</cus:StartDate>
               <cus:CustomerAccountSiteUse>
                  <cus:SiteUseCode>BILL_TO</cus:SiteUseCode>
                  <cus:CreatedByModule>HZ_WS</cus:CreatedByModule>
               </cus:CustomerAccountSiteUse>
            </cus:CustomerAccountSite>
         </typ:customerAccount>
      </typ:createCustomerAccount>
   </soapenv:Body>
</soapenv:Envelope>
After the above code is run – check to see if the customer is created in the system or not using the following queries:
select * from hz_cust_accounts  -- get the account_number

select *
from hz_cust_acct_sites_all
where cust_account_id = (select cust_account_id
                           from hz_cust_accounts
                         where account_number = <account number>)

select *
from hz_cust_site_uses_all
where CUST_ACCT_SITE_ID = (select CUST_ACCT_SITE_ID
                           from hz_cust_acct_sites_all
                         where cust_account_id = (select cust_account_id
                                                    from hz_cust_accounts
where account_number = <account number>))Warning: count(): Parameter must be an array or an object that implements Countable in /var/www/wp-content/themes/WpPremium/author.php on line 78
Creating a Party or Organization using REST API – Oracle Fusion
In the next few posts, we will try to create the TCA hierarchy objects such as Organization, Party, Party Sites, Party Site Uses, Accounts, Account Sites, Contacts etc. using Webservice (and SOAP as a tool) .
Also, the FBDI process need to be used for large data imports like master conversion process and not for daily data integration with third party systems. For daily integrations, Webservices such as SOAP or REST need to be used.
After 20D release, Organizations will be created using REST API. Accounts, Sites, Site Usage, Profile will be created using SOAP Webservices.
In this post, we will see what is the data that is required to create a Party or Organization. Later we will run few queries to see the data created in Oracle Fusion.
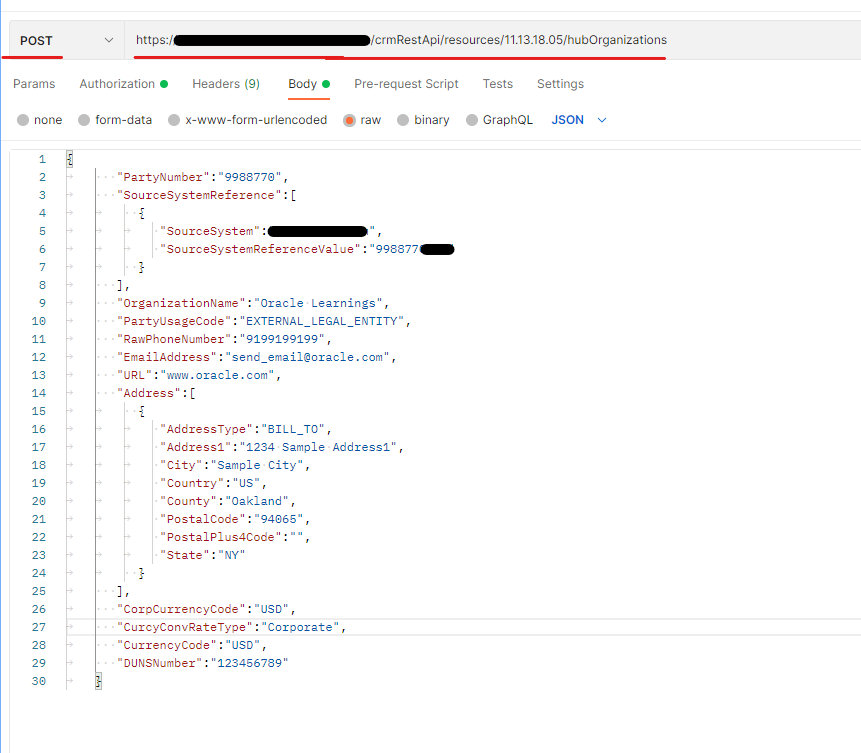
Use POSTMAN or some other tool to run the following REST API.
Request URL: https://xxx-your-oracle.oraclecloud.com/crmRestApi/resources/11.13.18.05/hubOrganizations
Method: POST
Payload:
{
	   "PartyNumber":"9988770",
	   "SourceSystemReference":[
		  {
			 "SourceSystem":"FranSysCustom",
			 "SourceSystemReferenceValue":"9988770LCE"
		  }
	   ],
	   "OrganizationName":"Oracle Learnings",
	   "PartyUsageCode":"EXTERNAL_LEGAL_ENTITY",
	   "RawPhoneNumber":"9199199199",
	   "EmailAddress":"[email protected]",
	   "URL":"www.oracle.com",
	   "Address":[
		  {
			 "AddressType":"BILL_TO",
			 "Address1":"1234 Sample Address1",
			 "City":"Sample City",
			 "Country":"US",
			 "County":"Oakland",
			 "PostalCode":"94065",
			 "PostalPlus4Code":"",
			 "State":"NY"
		  }
	   ],
	   "CorpCurrencyCode":"USD",
	   "CurcyConvRateType":"Corporate",
	   "CurrencyCode":"USD",
	   "DUNSNumber":"123456789"
}
Upon running this, the response will have the Party ID and Party Site ID. You can use this Party ID to further create Accounts etc.
Queries:
select * from hz_parties where party_name = 'Oracle Learnings';select * from hz_party_sites where party_id in (select party_id from hz_parties where party_name = 'Oracle Learnings');select *
from hz_party_site_uses
where party_site_id in (select party_site_id
from hz_party_sites
where party_id in (select party_id from hz_parties where party_name = 'Oracle Learnings'))
select *
from hz_locations
where location_id in (select location_id from hz_party_sites where party_id in (select party_id from hz_parties where party_name = 'Oracle Learnings'))
And thus, your Organization / Party, Party Site, Party Site Use, Location is created with a single call to the REST API.
Warning: count(): Parameter must be an array or an object that implements Countable in /var/www/wp-content/themes/WpPremium/author.php on line 78
Update Receipt Method on AR Invoice
The following Webservice code can be used to Update Receipt Method on the AR Invoice. Some of the conditions that are required are that the Invoice need to be in Complete Status. The Complete button should be in enabled status. That is, if a receipt is applied on the invoice, then we cannot modify the Receipt Method on the Invoice.
Get the Customer Transaction ID for the Invoice using the following query:
select customer_trx_id from ra_customer_trx_all where trx_number = <ar_invoice_number>; WSDL used is: https://xxx-your-oracleserver.oraclecloud.com/fscmService/StandardReceiptService?WSDL
Code to update the Receipt Method is:
<soapenv:Envelope xmlns:soapenv="http://schemas.xmlsoap.org/soap/envelope/" xmlns:typ="http://xmlns.oracle.com/apps/financials/receivables/transactions/invoices/invoiceService/types/" xmlns:inv="http://xmlns.oracle.com/apps/financials/receivables/transactions/invoices/invoiceService/" xmlns:typ1="http://xmlns.oracle.com/adf/svc/types/">
<soapenv:Header/>
<soapenv:Body>
   <typ:processUpdateCCToken>
      <typ:changeOperation>Create</typ:changeOperation>
      <!--Zero or more repetitions:-->
      <typ:updateCCToken>
      <inv:CustomerTrxId>9999938381</inv:CustomerTrxId>
      <inv:ReceiptMethod>New Receipt Method Name</inv:ReceiptMethod>
   </typ:updateCCToken>
      <typ:processControl>
         <typ1:partialFailureAllowed>true</typ1:partialFailureAllowed>
      </typ:processControl>
   </typ:processUpdateCCToken>
</soapenv:Body>
</soapenv:Envelope>Warning: count(): Parameter must be an array or an object that implements Countable in /var/www/wp-content/themes/WpPremium/author.php on line 78
Modify default browser to Chrome from Internet Explorer
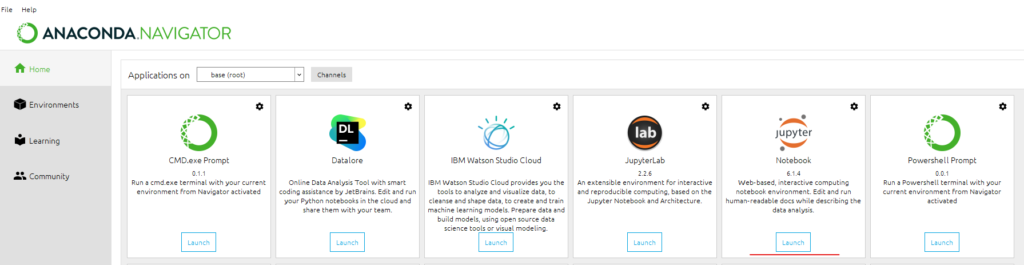
Upon clicking the Launch Button for Jupyter Notebook on the Anaconda Navigator, the default browser in the system opens up. Usually, if the default browser is not Chrome/Mozilla, most of the corporate computers have Internet Explorer as the default browser.
In order to change the default browser from IE to Chrome, especially when you don’t have Sysadmin rights on the computer, go through the follow process.
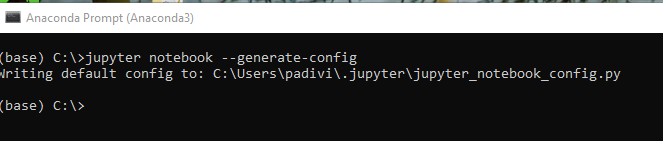
- Search for Anaconda Command on your computer.
- In the command prompt, enter the following command: jupyter notebook –generate-config
- Upon hitting enter, it gives the directory of the jupyter_notebook_config.py file.
- Navigate to that location and open the file in notepad or notepad++
- Search for
c.NotebookApp.browser = '' - Since the command is commented, the application picks the default Internet explorer.
- Change it so that it points to Chrome exe file.
c.NotebookApp.browser = 'C:/Program Files (x86)/Google/Chrome/Application/chrome.exe %s' - Save and close the file.
Click the Launch button on the Anaconda Navigator, and it should open in Chrome now.
Warning: count(): Parameter must be an array or an object that implements Countable in /var/www/wp-content/themes/WpPremium/author.php on line 78
Warning: count(): Parameter must be an array or an object that implements Countable in /var/www/wp-content/themes/WpPremium/author.php on line 78
Script to create a Cash Receipt using Oracle API (AR)
The following post can be used to create a Cash receipt in Oracle Receivables. The “ar_receipt_api_pub.create_cash” SQL API is used to create cash receipts for the payment received in the form of a check or cash. Cash receipts can be created as identified (with a customer) or as unidentified (without a customer).
DECLARE
    l_return_status       VARCHAR2 (1);
    l_msg_count           NUMBER;
    l_msg_data            VARCHAR2 (240);
    p_count               NUMBER := 0;
    l_cash_receipt_id     ar_cash_receipts_all.cash_receipt_id%TYPE;
    l_user_name           fnd_user.user_name%TYPE := 'PADIVI';
    g_user_id             fnd_user.user_name%TYPE;
    l_resp_id             fnd_responsibility.responsibility_id%TYPE;
    l_appl_id             fnd_application.application_id%TYPE;
    l_ou_id               hr_operating_units.organization_id%TYPE;
    l_receipt_method_id   ar_receipt_methods.receipt_method_id%TYPE;
BEGIN
    -- Get User ID
    BEGIN
        SELECT user_id
          INTO g_user_id
          FROM fnd_user
         WHERE user_name = l_user_name;
    EXCEPTION
        WHEN OTHERS
        THEN
            DBMS_OUTPUT.put_line (
                'Error during deriving User ID and error is: ' || SQLERRM);
    END;

    --Get Responsibility ID
    BEGIN
        SELECT RESPONSIBILITY_ID
          INTO l_resp_id
          FROM fnd_responsibility
         WHERE responsibility_key = 'RECEIVABLES_MANAGER'; --- enter the responsibility name that has access to create Invoices
    EXCEPTION
        WHEN OTHERS
        THEN
            DBMS_OUTPUT.put_line (
                   'Error during deriving Responsibility ID and error is: '
                || SQLERRM);
    END;

    --Get Application ID
    BEGIN
        SELECT application_id
          INTO l_appl_id
          FROM fnd_application
         WHERE application_short_name = 'AR';
    EXCEPTION
        WHEN OTHERS
        THEN
            DBMS_OUTPUT.put_line (
                   'Error during deriving application ID and error is: '
                || SQLERRM);
    END;

    -- Get Organization ID for that Operating Unit
    BEGIN
        SELECT organization_id
          INTO l_ou_id
          FROM hr_operating_units
         WHERE name = 'p_ou_name';
    EXCEPTION
        WHEN OTHERS
        THEN
            DBMS_OUTPUT.put_line (
                   'Error while deriving Operating Unit ID and error is: '
                || SQLERRM);
    END;

    -- Get Receipt Method Id
    BEGIN
        SELECT RECEIPT_METHOD_ID
          INTO l_receipt_method_id
          FROM AR_RECEIPT_METHODS
         WHERE NAME = 'p_receipt_method'; -- Enter receipt method here.
    EXCEPTION
        WHEN OTHERS
        THEN
            DBMS_OUTPUT.put_line (
                   'Error while deriving Operating Unit ID and error is: '
                || SQLERRM);
    END;

    mo_global.init ('AR');
    mo_global.set_policy_context ('S', l_ou_id);
    fnd_global.apps_initialize (user_id        => g_user_id,
                                resp_id        => l_resp_id,
                                resp_appl_id   => l_appl_id);

    ar_receipt_api_pub.create_cash (
        p_api_version         => 1.0,
        p_init_msg_list       => fnd_api.g_true,
        p_commit              => fnd_api.g_true,
        p_validation_level    => fnd_api.g_valid_level_full,
        x_return_status       => l_return_status,
        x_msg_count           => l_msg_count,
        x_msg_data            => l_msg_data,
        p_currency_code       => 'USD',
        p_amount              => 105,              -- Pass the Receipt Amount
        p_receipt_number      => 'Test Rcpt 101',  -- Pass the Receipt Number
        p_receipt_date        => SYSDATE,
        p_gl_date             => '30-NOV-2018',
        p_customer_number     => 'p_customer_number',    -- Account number of the Customer against whom the Receipt is being created for. Hz_cust_accounts.account_number
        p_receipt_method_id   => l_receipt_method_id,
        p_cr_id               => l_cash_receipt_id);

    DBMS_OUTPUT.put_line (
           'API Return Status is - '
        || l_return_status
        || ' and l_msg_count is - '
        || l_msg_count);
    DBMS_OUTPUT.put_line ('Cash Receipt id is - ' || l_cash_receipt_id);


    IF l_msg_count = 1
    THEN
        DBMS_OUTPUT.put_line ('Error Message is - ' || l_msg_data);
    ELSIF l_msg_count > 1
    THEN
        LOOP
            p_count := p_count + 1;
            l_msg_data :=
                fnd_msg_pub.get (fnd_msg_pub.g_next, fnd_api.g_false);

            IF l_msg_data IS NULL
            THEN
                EXIT;
            END IF;

            DBMS_OUTPUT.put_line (
                'Message ' || p_count || '. ' || l_msg_data);
        END LOOP;
    END IF;
END;
/Warning: count(): Parameter must be an array or an object that implements Countable in /var/www/wp-content/themes/WpPremium/author.php on line 78
Warning: count(): Parameter must be an array or an object that implements Countable in /var/www/wp-content/themes/WpPremium/author.php on line 78
Script to create a Receipt Write-off (AR)
The following post will detail the steps that are done to create a Receipt Write-Off on an AR Receipt. The PL/SQL API Ar_receipt_api_pub.activity_application is used to apply an adjustment on a Receipt – in this case – a Write-Off on a Receipt.
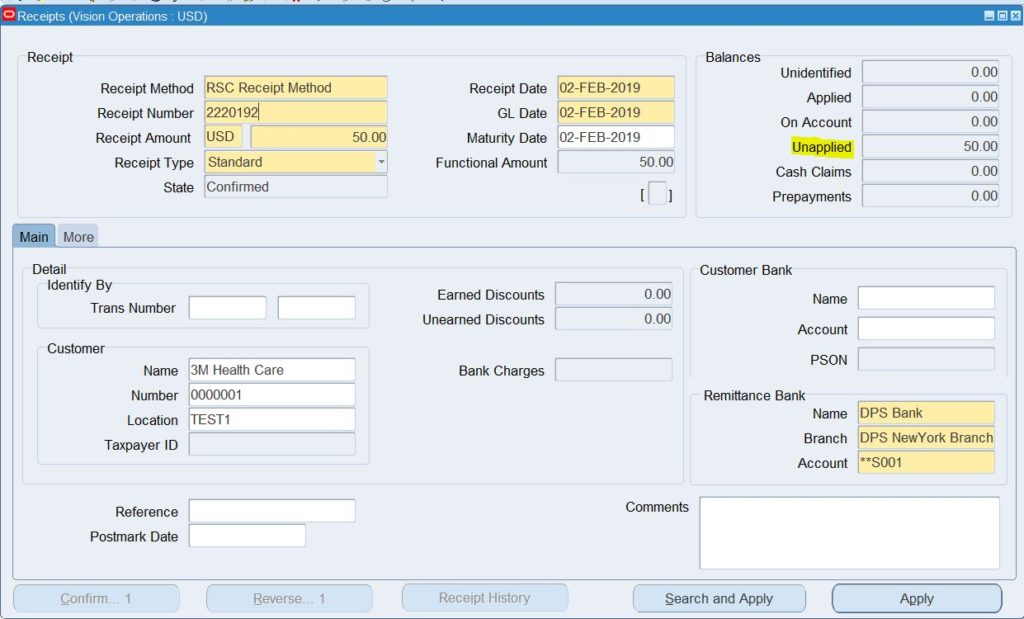
In this post – before doing a Write-Off on a Receipt – let us create a sample Receipt first. In order to create a Receipt – Navigate to the following: Receivables Superuser -> Receipts -> Receipts. Enter the following mandatory fields like – Receipt Method, Receipt Number, Receipt Amount, Customer details and click Save. Upon creating a Receipt – it shows up as below:
-- Script to create a Receipt Write-off
DECLARE
    CURSOR c_receipt_data
    IS
        SELECT cash_receipt_id, receipt_number, amount, org_id
          FROM ar_Cash_receipts_all
         WHERE receipt_number = '2220192'   -- Enter your receipt number here
           AND status = 'UNAPP';

    l_applied_payment_schedule_id    NUMBER;
    l_receivables_trx_id             NUMBER;

    x_return_status                  VARCHAR2 (200);
    x_msg_count                      NUMBER;
    x_msg_data                       VARCHAR2 (200);
    p_link_to_customer_trx_id        ra_customer_trx.customer_trx_id%TYPE;
    p_apply_date                     ar_receivable_applications.apply_date%TYPE;
    p_apply_gl_date                  ar_receivable_applications.gl_date%TYPE;
    p_ussgl_transaction_code         ar_receivable_applications.ussgl_transaction_code%TYPE;
    p_attribute_rec                  AR_RECEIPT_API_PUB.attribute_rec_type;
    p_global_attribute_rec           AR_RECEIPT_API_PUB.global_attribute_rec_type;
    p_comments                       ar_receivable_applications.comments%TYPE;
    p_application_ref_type           ar_receivable_applications.application_ref_type%TYPE;
    p_application_ref_id             ar_receivable_applications.application_ref_id%TYPE;
    p_application_ref_num            ar_receivable_applications.application_ref_num%TYPE;
    p_secondary_application_ref_id   ar_receivable_applications.secondary_application_ref_id%TYPE;
    p_payment_set_id                 ar_receivable_applications.payment_set_id%TYPE;
    p_receivable_application_id      ar_receivable_applications.receivable_application_id%TYPE;
    p_customer_reference             ar_receivable_applications.customer_reference%TYPE;
    p_val_writeoff_limits_flag       VARCHAR2 (200);
    p_called_from                    VARCHAR2 (200);
    p_netted_receipt_flag            VARCHAR2 (200);
    p_netted_cash_receipt_id         ar_cash_receipts.cash_receipt_id%TYPE;
    p_secondary_app_ref_type         ar_receivable_applications.secondary_application_ref_type%TYPE;
    p_secondary_app_ref_num          ar_receivable_applications.secondary_application_ref_num%TYPE;

BEGIN

    l_applied_payment_schedule_id := -3;

    SELECT RECEIVABLES_TRX_ID
      INTO l_receivables_trx_id
      FROM ar_receivables_trx_all
     WHERE name = 'Receipt Write Off';

    FOR rec_recpt_data IN c_receipt_data
    LOOP

    mo_global.init ('AR');
    mo_global.set_policy_context ('S', rec_recpt_data.org_id);

         AR_RECEIPT_API_PUB.Activity_application (
                                        p_api_version                    => 1.0,
                                        p_init_msg_list                  => FND_API.G_TRUE,
                                        p_commit                         => FND_API.G_TRUE,
                                        p_validation_level               => FND_API.G_VALID_LEVEL_FULL,
                                        x_return_status                  => x_return_status,
                                        x_msg_count                      => x_msg_count,
                                        x_msg_data                       => x_msg_data,
                                        p_cash_receipt_id                => rec_recpt_data.cash_receipt_id,
                                        p_receipt_number                 => rec_recpt_data.receipt_number,
                                        p_amount_applied                 => rec_recpt_data.amount,
                                        p_applied_payment_schedule_id    => l_applied_payment_schedule_id,
                                        p_link_to_customer_trx_id        => p_link_to_customer_trx_id,
                                        p_receivables_trx_id             => l_receivables_trx_id,
                                        p_apply_date                     => p_apply_date,
                                        p_apply_gl_date                  => p_apply_gl_date,
                                        p_ussgl_transaction_code         => p_ussgl_transaction_code,
                                        p_attribute_rec                  => p_attribute_rec,
                                        p_global_attribute_rec           => p_global_attribute_rec,
                                        p_comments                       => p_comments,
                                        p_application_ref_type           => p_application_ref_type,
                                        p_application_ref_id             => p_application_ref_id,
                                        p_application_ref_num            => p_application_ref_num,
                                        p_secondary_application_ref_id   => p_secondary_application_ref_id,
                                        p_payment_set_id                 => p_payment_set_id,
                                        p_receivable_application_id      => p_receivable_application_id,
                                        p_customer_reference             => p_customer_reference,
                                        p_val_writeoff_limits_flag       => p_val_writeoff_limits_flag,
                                        p_called_from                    => p_called_from,
                                        p_netted_receipt_flag            => p_netted_receipt_flag,
                                        p_netted_cash_receipt_id         => p_netted_cash_receipt_id,
                                        p_secondary_app_ref_type         => p_secondary_app_ref_type,
                                        p_secondary_app_ref_num          => p_secondary_app_ref_num);

        dbms_output.put_line ('Return status from API is: '||x_return_status);
        dbms_output.put_line ('Return= '||SUBSTR(x_msg_data,500));
        dbms_output.put_line ('Receivable Application ID is: '||p_receivable_application_id);
    END LOOP;

COMMIT;

EXCEPTION
    WHEN OTHERS
    THEN
        DBMS_OUTPUT.put_line ('Error: ' || SQLERRM);
END;
And thus, happy Adjusting Write-offs.
Warning: count(): Parameter must be an array or an object that implements Countable in /var/www/wp-content/themes/WpPremium/author.php on line 78
Warning: count(): Parameter must be an array or an object that implements Countable in /var/www/wp-content/themes/WpPremium/author.php on line 78
Receipt Write-Off (AR) – Error Messages
There are a couple of steps to follow before doing any kind of Adjustment on AR Transactions.
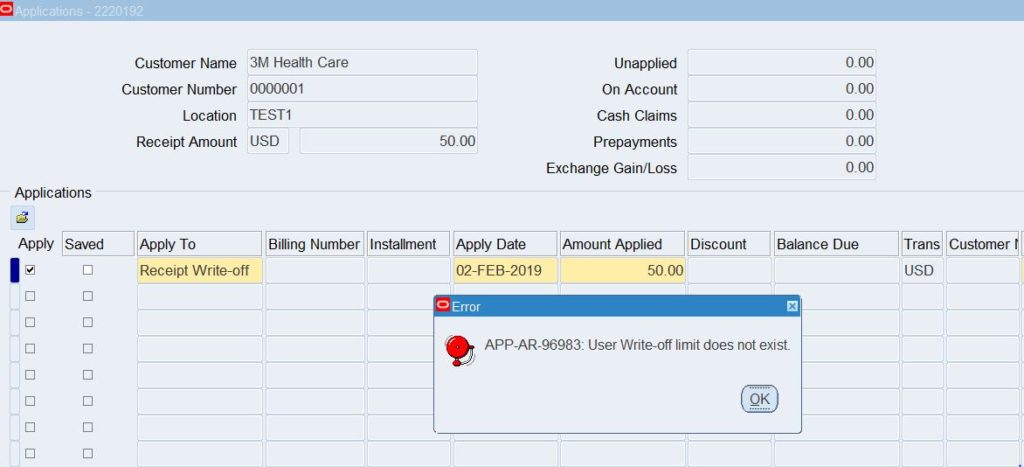
- In order to make any adjustments like a Receipt Write-Off – Approval Limits have to be defined for the user who is doing the Adjustment. If the Approval Limit is not set, then the Receivables window throws an error to set up the Approval Limit with the error Message: “APP-AR-96983: User Write-off limit does not exist.“
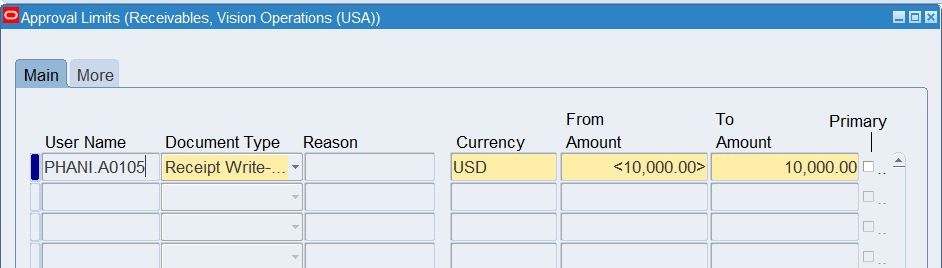
In order to correct the above message, perform the following actions: Navigate to the following – Receivables Super User -> Setup -> Transactions -> Approval Limits. In the Approval Limits window – create a record. There exists one record with the combination of a User, Adjustment Type, Currency in the Approval Limits window. Enter a record for the user as below.
- And there is a system profile option that needs to be setup before any adjustment is done on a receipt. Without setting that option first, the user may face the following error message – “APP-AR-96981: Please set the receipt write-off limits range system option. “
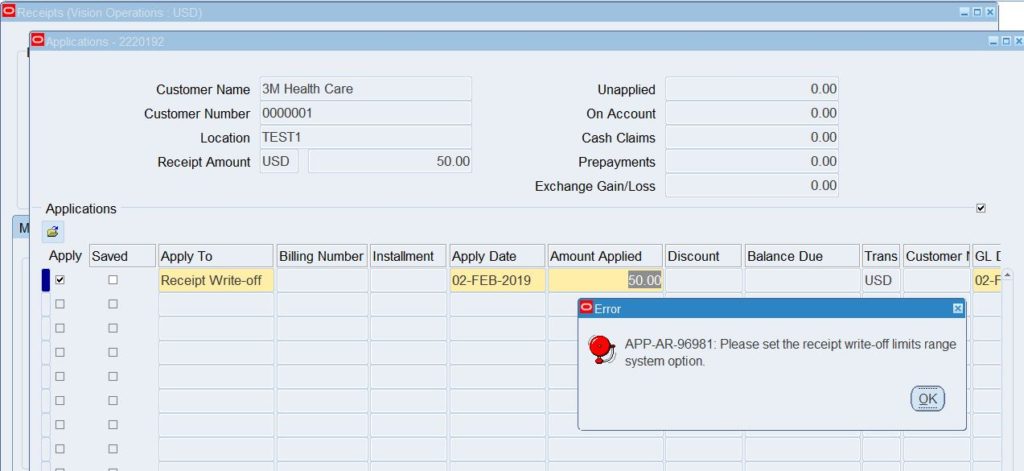
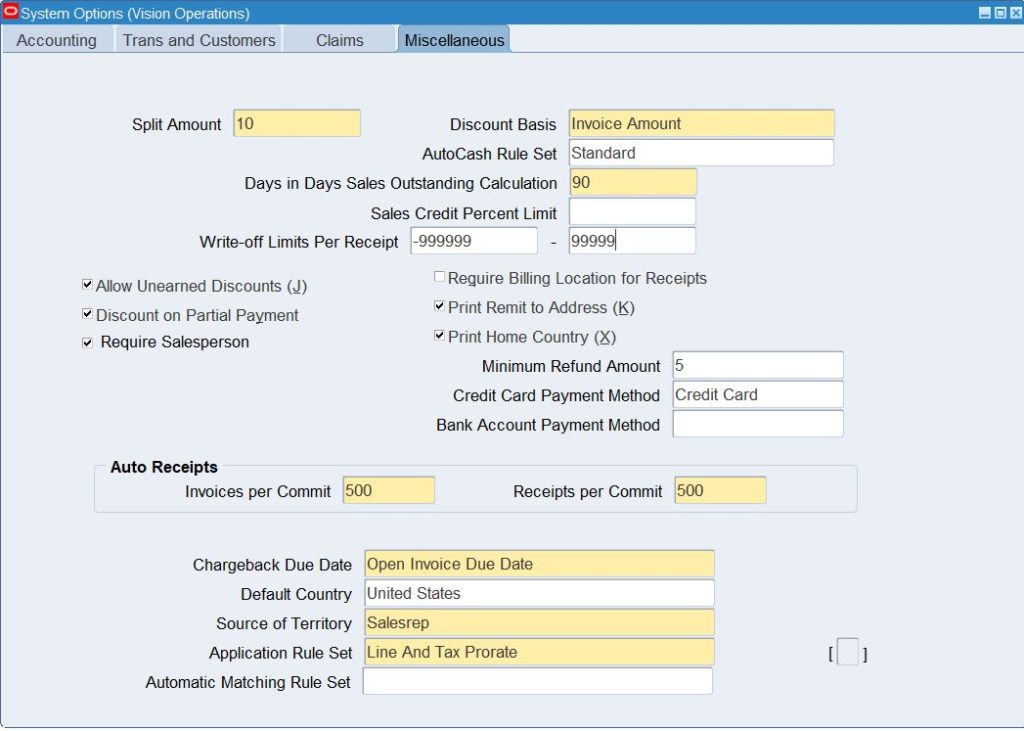
In order to correct the above messages, perform the following actions: Navigate to Receivables Super User -> Setup -> System -> System Options -> Miscellaneous Tab. For the Write-off Limits Per Receipt – enter the values as required in the company. After entering the values – the screen looks like below.
These above two steps needs to be completed before creating an adjustment on an AR Receipt like a Receipt Write-Off.