Posts By: Phani Adivi
Warning: count(): Parameter must be an array or an object that implements Countable in /var/www/wp-content/themes/WpPremium/author.php on line 78
Create Customer using create_cust_account API
The following script helps to create a Customer with basic information (mandatory information) in Oracle Applications TCA Architecture.
DECLARE
l_cust_account_rec hz_cust_account_v2pub.cust_account_rec_type;
l_org_rec hz_party_v2pub.organization_rec_type;
l_customer_profile_rec hz_customer_profile_v2pub.customer_profile_rec_type;
l_account_name hz_cust_accounts.account_name%TYPE;
l_msg_count NUMBER;
l_msg_data VARCHAR2 (4000);
l_err_msg VARCHAR2 (4000);
l_return_status VARCHAR2 (1);
l_cust_account_id NUMBER;
l_account_number hz_cust_accounts.account_number%TYPE;
l_party_id hz_cust_accounts.party_id%TYPE;
l_party_number hz_parties.party_id%TYPE;
l_cust_acct_profile_id hz_customer_profiles.cust_account_profile_id%TYPE;
BEGIN
l_cust_account_rec.account_name := 'Test Customer 98765432';
l_cust_account_rec.account_number := '98765432';
l_cust_account_rec.customer_type := 'R';
l_cust_account_rec.attribute1 := SYSDATE;
l_cust_account_rec.created_by_module := 'HZ_CPUI';
l_org_rec.organization_name := 'Test Customer 98765432';
hz_cust_account_v2pub.create_cust_account (
p_init_msg_list => fnd_api.g_true,
p_cust_account_rec => l_cust_account_rec,
p_organization_rec => l_org_rec,
p_customer_profile_rec => l_customer_profile_rec,
p_create_profile_amt => fnd_api.g_true,
x_return_status => l_return_status,
x_msg_count => l_msg_count,
x_msg_data => l_msg_data,
x_cust_account_id => l_cust_account_id,
x_account_number => l_account_number,
x_party_id => l_party_id,
x_party_number => l_party_number,
x_profile_id => l_cust_acct_profile_id);
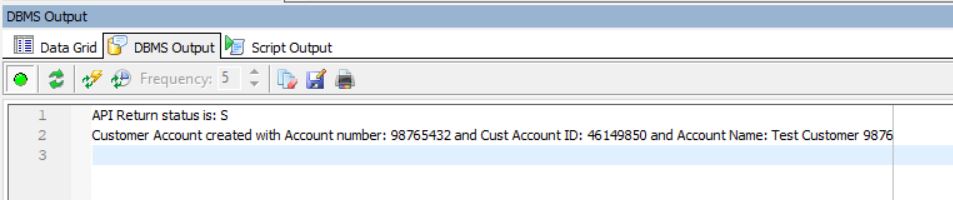
DBMS_OUTPUT.put_line ('API Return status is: ' || l_return_status);
IF l_return_status <> 'S'
THEN
DBMS_OUTPUT.put_line ('Error message is: ' || SUBSTR (l_msg_data, 200));
END IF;
IF l_return_status = 'S'
THEN
BEGIN
SELECT account_name
INTO l_account_name
FROM hz_cust_accounts
WHERE account_number = '98769876';
DBMS_OUTPUT.put_line (
'Customer Account created with Account number: '
|| l_account_number
|| ' and Cust Account ID: '
|| l_cust_account_id
|| ' and Account Name: '
|| l_account_name);
EXCEPTION
WHEN OTHERS
THEN
DBMS_OUTPUT.put_line (
'Error during deriving Account Name: ' || SQLERRM);
END;
END IF;
EXCEPTION
WHEN OTHERS
THEN
DBMS_OUTPUT.put_line ('Error during creating account: ' || SQLERRM);
END;
The DMBS Output is shown as below:
Upon running the script above, a Customer is created. The customer can be found in Hz_Cust_accounts table.
Below is the query to check the customer and some important columns in the Hz_Cust_Accounts table.
SELECT cust_account_id,
       party_id,
       account_number,
       status,
       customer_type,
       account_name,
       created_by_module,
       h.*
  FROM hz_cust_accounts h
 WHERE account_number = '98765432';
Warning: count(): Parameter must be an array or an object that implements Countable in /var/www/wp-content/themes/WpPremium/author.php on line 78
Customer, Party, Party Sites, Customer Sites, Site Uses
In this post, we shall look at the details of Creating a Customer and the tables affecting it.
Navigation: AR Superuser -> Customers -> Customers
In the OAF page that opened, fill out the following details:
Organization Name, Account Number, Profile Class: Default (Oracle provides this profile class) and Account Site Address: Give a correct address that exists as per HZ_GEOGRAPHIES hierarchy.
Upon creating the account, a record now exists in the Hz_Cust_Accounts table
In the example below – created a Customer with Account number – 10820181
HZ_CUST_ACCOUNTS
SELECT *
  FROM hz_cust_accounts
 WHERE account_number = '10820181';

As can be seen a Party is also created with a party Id – 51284811
HZ_PARTIES
SELECT PARTY_ID, PARTY_NUMBER, PARTY_NAME, PARTY_TYPE, STATUS, JGZZ_FISCAL_CODE, H.*
  FROM hz_parties H
 WHERE party_id = 51284811;
--- JGZZ_FISCAL_CODE holds the tax payer id.

HZ_PARTY_SITES
 SELECT PARTY_SITE_ID, PARTY_ID, LOCATION_ID, PARTY_SITE_NUMBER, STATUS, CREATED_BY_MODULE, H.*
  FROM HZ_PARTY_SITES H
 WHERE PARTY_ID = 51284811;

HZ_LOCATIONS
Get the location_id from the Hz_Party_Sites
SELECT location_id,
       ORIG_SYSTEM_REFERENCE,
       country,
       address1,
       address2,
       city,
       state,
       county,
       postal_code,
       h.*
  FROM hz_locations h
 WHERE location_id = 38779066;
HZ_CUST_ACCT_SITES_ALL
Hz_Cust_Acct_Sites_all table details about the customer account sites across all the operating units. A Customer site has addresses where the customer intends to do business at. A Customer can have more than one site and across more than one operating unit. The site signifies whether the site is a Primary Bill_To or a Primary Ship_To site. Join between the Customer table and Customer site table is the Cust_acct_id.
A Bill_To_Flag indicates if it is a bill to site.
- Y for a Bill-To site
- P for the primary Bill-To site
- N for a site that is not a Bill-To site.
A Ship_to_Flag indicates if it is a Ship to site.
- Y for a Ship-To site
- P for the primary Ship-To site
- N for a site that is not a Ship-To site
SELECT cust_acct_site_id,
       cust_account_id,
       party_site_id,
       status,
       bill_to_flag,
       h.*
  FROM hz_cust_acct_sites_all h
 WHERE cust_account_id = 46149842;

HZ_CUST_SITE_USES_ALL
The HZ_CUST_SITE_USES_ALL table stores business purposes assigned to customer account sites, for example Bill-To, Ship-To, and
Statements. Each customer account site can have one or more purposes. This table is a child of the HZ_CUST_ACCT_SITES_ALL table, with the foreign key CUST_ACCT_SITE_ID. The HZ_CUST_SITE_USES_ALL table also stores operating unit identifier, though the HZ_CUST_ACCT_SITES_ALL table itself stores the operating unit for customer account sites.
SELECT site_use_id,
       cust_acct_site_id,
       site_use_code,
       primary_flag     status,
       location,
       h.*
  FROM HZ_CUST_SITE_USES_ALL h
 WHERE cust_acct_site_id = 49348980;
Warning: count(): Parameter must be an array or an object that implements Countable in /var/www/wp-content/themes/WpPremium/author.php on line 78
TCA Architecture
Understanding TCA Architecture in Oracle Applications:
Oracle Trading Community Architecture (TCA) is a data model that allows us to understand and manage the complex interlinkages between the parties, customers, sites, their uses and relationships. This information is maintained in the TCA Registry, which is the single source of trading community information for Oracle E-Business Suite applications. These applications, as well as TCA itself, provide user interfaces, batch data entry functionality, and other features for you to view, create, and update Registry information.
What is the key difference between a Party and an Account?
As explained well here in this link, the concept of a Party came into existence when Oracle bought Siebel. The main difference between a Party and a Customer is that a Party can be an entity that may/may not have bought an item/service from the company. But an account is an entity that has made a purchase in some form from the company already.
Consider a scenario where you walk into a TV store to look at the new TV models and their price. There is a fair chance that you may/may not buy a TV that fits your taste and budget and leave. In the scenario where you did not buy, but the store manager takes some basic information from you like your name, address, email id, telephone number and other details like budget and tv model. The manager then enters this information into a database where you will become a Party. This information is used by the company to send communication and marketing emails about new models and prices that may entice a Party to become a Customer. All this activity is maintained in CRM Module where the target is to make the Party a Customer and maintain relationship with the same. (In all the above scenario, you are still a Party).
Now, that you got all those emails and messages, and you got satisfied and you bought a TV from that store. Now, you became a Customer. All the transaction details related to this deal are stored using the account number. Thus, in Oracle, all the details in Accounts Receivables use the Customer account number for report generation purposes.
Can a Party exist without being a Customer?
Yes. A person may just receive information from the company but did not buy any item yet, in this scenario that person/entity is still a Party and not a Customer.
What is the use of a Party without being a Customer?
The CRM Module main motto is marketing and it is the process of identifying, creating and retaining a Customer. The CRM looks at a Party (that is not a customer yet) as a Potential Customer and tries to reach him/her/entity with marketing emails and information. A Party becomes a Customer and more Customers bring in revenue.
Where is a Party Used?
When a Party is created, it creates a record in HZ_PARTIES table. This is primarily used by the CRM Module.
Warning: count(): Parameter must be an array or an object that implements Countable in /var/www/wp-content/themes/WpPremium/author.php on line 78
Create Table Scripts
Create Table script is one of the initial scripts to be learnt when learning PL/SQL. In this post, we shall look at the variations of creating a table script with few columns and data in it.
1: Basic CREATE Table.
Syntax: CREATE TABLE TABLE_NAME (COLUMN_NAME_1 DATATYPE, COLUMN_NAME_2 DATATYPE);
CREATE TABLE xx_test_table
(
emp_id NUMBER,
emp_name VARCHAR2 (200),
join_date DATE
);
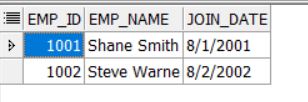
INSERT INTO xx_test_table
VALUES (1001, 'Shane Smith', '01-AUG-2001');
INSERT INTO xx_test_table
VALUES (1002, 'Steve Warne', '02-AUG-2002');
SELECT * FROM xx_test_table;
Result:
2: Create Table with Default Value for columns.
A default value can be provided for columns in a table in case a value is not provided in the Insert statement. In that scenario, the default value is populated in that column.
CREATE TABLE xx_test_table
(
emp_id NUMBER (6, 2),
emp_name VARCHAR2 (200) DEFAULT 'John Doe',
join_date DATE
);
INSERT INTO xx_test_table
VALUES (1001, 'Shane Smith', '01-AUG-2001');
INSERT INTO xx_test_table
VALUES (1002, 'Steve Warne', '02-AUG-2002');
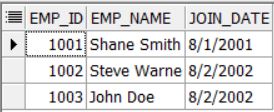
INSERT INTO xx_test_table (emp_id, join_date)
VALUES (1003, '02-AUG-2002');
SELECT * FROM xx_test_table;
Result:
3. NOT NULL on a column
During creation of a table, it can be mentioned that a particular column cannot have NULL values in it. In the example below, the column Join_date has a NOT NULL condition on it.
CREATE TABLE xx_test_table
(
emp_id NUMBER (6, 2),
emp_name VARCHAR2 (200) DEFAULT 'John Doe',
join_date DATE NOT NULL
);
INSERT INTO xx_test_table
VALUES (1001, 'Shane Smith', '01-AUG-2001');
INSERT INTO xx_test_table
VALUES (1002, 'Steve Warne', '02-AUG-2002');
INSERT INTO xx_test_table (emp_id, join_date)
VALUES (1003, '02-AUG-2002');
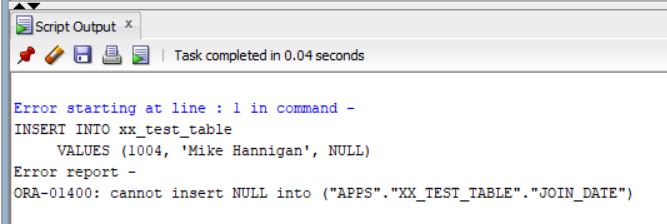
INSERT INTO xx_test_table
VALUES (1004, 'Mike Hannigan', NULL);
Thus, in the last line, when we try to insert a NULL value in to the Join_date column, we get the following error message.
“ORA-01400: cannot insert NULL into (“APPS”.”XX_TEST_TABLE”.”JOIN_DATE”)”
4. Defining Constraints on Columns
A constraint is an optional clause while creating a table. A constraint is a rule according to which the data is loaded into that table. A constraint can be defined on column level as well as at table level.
Usually the constraints follow the following naming standards: <tablename>_<column_name>_<constraint_abbreviation>
Column Level Constraints: These constraints refer to a single column on the table and do not specify a column name.
- Primary Key: Indicates that data in each row of the column can be identified uniquely using this primary key. The identified column must be defined as NOT NULL. In the example below, the emp_id column is being assigned as a Primary Key.
CREATE TABLE xx_test_table
(
emp_id NUMBER (6, 2) NOT NULL CONSTRAINT xx_test_emp_id_PK PRIMARY KEY,
emp_name VARCHAR2 (200) DEFAULT 'John Doe',
join_date DATE NOT NULL
);
INSERT INTO xx_test_table
VALUES (1001, 'Shane Smith', '01-AUG-2001');
INSERT INTO xx_test_table
VALUES (1002, 'Steve Warne', '02-AUG-2002');
INSERT INTO xx_test_table (emp_id, join_date)
VALUES (1003, '02-AUG-2002');
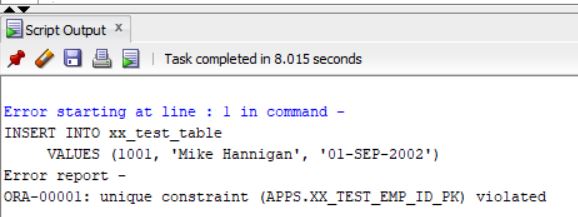
INSERT INTO xx_test_table
VALUES (1001, 'Mike Hannigan', '01-SEP-2002');
Thus, when a duplicate value is being inserted in the 4th line, a Primary Key Violation is being thrown.
- Unique: Indicates that the values in the column must be unique. In the example below, the emp_id column has a Unique constraint on it.
CREATE TABLE xx_test_table
(
emp_id NUMBER (6, 2) CONSTRAINT xx_test_emp_id_UQ UNIQUE,
emp_name VARCHAR2 (200) DEFAULT 'John Doe',
join_date DATE NOT NULL
);
INSERT INTO xx_test_table
VALUES (1001, 'Shane Smith', '01-AUG-2001');
INSERT INTO xx_test_table
VALUES (1002, 'Steve Warne', '02-AUG-2002');
INSERT INTO xx_test_table (emp_id, join_date)
VALUES (1003, '02-AUG-2002');
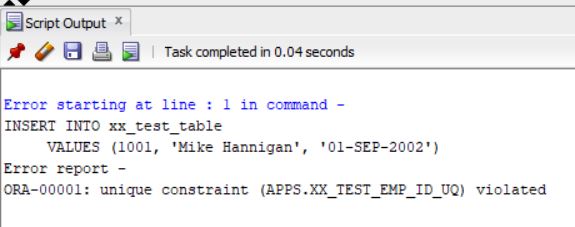
INSERT INTO xx_test_table
VALUES (1001, 'Mike Hannigan', '01-SEP-2002');
Thus, when we try to insert a value of 1001 into emp_id, when the value already exists, then the command throws an error.
- CHECK: The CHECK constraint specifies certain rules for the data in the column according to which the user likes the data to be. In the example below, the CHECK constraint makes sure that the Salary is always above 5000.
CREATE TABLE xx_test_table
(
emp_id NUMBER (6, 2),
emp_name VARCHAR2 (200) DEFAULT 'John Doe',
join_date DATE NOT NULL,
salary NUMBER (8,2) CONSTRAINT sal_chk CHECK (salary > 5000)
);
INSERT INTO xx_test_table
VALUES (1001, 'Shane Smith', '01-AUG-2001', 8500);
INSERT INTO xx_test_table
VALUES (1002, 'Steve Warne', '02-AUG-2002', 7200);
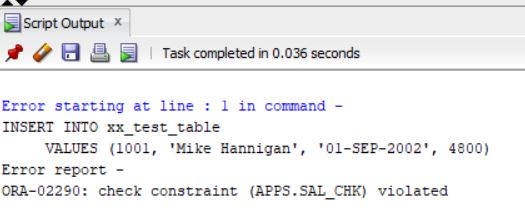
INSERT INTO xx_test_table
VALUES (1001, 'Mike Hannigan', '01-SEP-2002', 4800);
Thus, when we try to insert the third line above, with a salary of 4800 (less than 5000), the insert command throws an error.
Warning: count(): Parameter must be an array or an object that implements Countable in /var/www/wp-content/themes/WpPremium/author.php on line 78
Cursors – Explicit Cursors
What are Cursors?
A cursor is a pointer to a private SQL area that stores information about the processing of a SELECT statement or a DML statement (Insert, Update or Delete). In layman terms, a Cursor is used to fetch (SELECT) a particular dataset from a much larger dataset which can then be used for data manipulation using other DML Operations like Insert, Update or Delete.
There are two types of Cursors: Implicit Cursors and Explicit Cursors.
In this post, we will discuss mainly about Explicit Cursors.
Explicit Cursors: Unlike Implicit cursors, application developers have control over the life cycle of the explicit cursors by manually performing the OPEN and FETCH operations and then CLOSE the Cursor.
A Cursor is defined in the declarative part of the PL/SQL Block and the following are three stages are part of the Cursor life cycle.
- OPEN
- Open: Database allocates a private work area in the user’s session memory for cursor processing.
- Parse SQL: Validates the SQL query for syntax and privileges.
- Bind SQL: Provides an input value to the bind variables that are part of the query.
- Executes the SQL Statement (that has the required conditions in the WHERE condition).
- FETCH
- Fetches the data from the parsed SQL statement. Fetches the data into a block variable and increments the record pointer.
- CLOSE
- Closes the cursor and releases the memory back to System Global Area (SGA).
Consider the following dataset to demonstrate an example of an Explicit cursor. Create a sample table and insert data into the table.
CREATE TABLE xx_test_cursor
(
    emp_name         VARCHAR2 (200),
    emp_id           NUMBER,
    emp_join_date    DATE,
    manager_name     VARCHAR2 (200)
);

INSERT INTO xx_test_cursor
     VALUES ('John',1001,SYSDATE - 30, 'Frank');

INSERT INTO xx_test_cursor
     VALUES ('Graeme', 1002, SYSDATE - 40, 'Frank');

INSERT INTO xx_test_cursor
     VALUES ('Shawn', 1003, SYSDATE - 50, 'Frank');

INSERT INTO xx_test_cursor
     VALUES ('Jonty', 1004, SYSDATE - 60, 'Frank');

INSERT INTO xx_test_cursor
     VALUES ('Mike', 1007, SYSDATE - 60, 'Frank');

INSERT INTO xx_test_cursor
     VALUES ('Peter', 1008, SYSDATE - 60, 'Justin');

INSERT INTO xx_test_cursor
     VALUES ('Jason', 1009, SYSDATE - 60, 'Justin');

INSERT INTO xx_test_cursor
     VALUES ('Glenn', 1010, SYSDATE - 60, 'Justin');

INSERT INTO xx_test_cursor
     VALUES ('Adam', 1011, SYSDATE - 60, 'Justin');

INSERT INTO xx_test_cursor
     VALUES ('Chris', 1012, SYSDATE - 60, 'Justin');

COMMIT;
SELECT * FROM xx_test_cursor
order by emp_id;

EMP_NAME	EMP_ID	EMP_JOIN_DATE	        MANAGER_NAME
John	         1,001	08/27/2018 19:01:10	Frank
Graeme	         1,002	08/17/2018 19:01:11	Frank
Shawn	         1,003	08/07/2018 19:01:12	Frank
Jonty	         1,004	07/28/2018 19:01:13	Frank
DARELL	         1,005	07/28/2018 19:23:58	Frank
Mike	         1,007	07/31/2018 01:50:23	Justin
Peter	         1,008	07/31/2018 01:50:24	Justin
Jason	         1,009	07/31/2018 01:50:26	Justin
Glenn	         1,010	07/31/2018 01:50:27	Justin
Adam	         1,011	07/31/2018 01:50:28	Justin
The following code will display the data from the table in the required format.
Cursor – FETCH
- Code from Line Number 2 to 5 is where the code is being defined in the declare section.
- Code in line number 13 opens the cursor.
- Code in line number 14 fetches the data from the SQL cursor into a record variable that has a cursor type datatype.
- Once all the data is fetched, code in line number 15 closes the Cursor.
- Code from Line 17 to 29, checks if there is any data in the record variable, then loops through the record using an index, and displays the data in the required format, and then closes the loop.
DECLARE
    CURSOR c_data
    IS
        SELECT emp_name, emp_join_date, manager_name
        FROM xx_test_cursor;

    TYPE rec_data_type IS TABLE OF c_data%ROWTYPE
         INDEX BY BINARY_INTEGER;

    l_data rec_data_type;

BEGIN
    OPEN c_data;
    FETCH c_data BULK COLLECT INTO l_data;
    CLOSE c_data;

    IF l_data.COUNT > 0
    THEN
        FOR i IN l_data.FIRST .. l_data.LAST
        LOOP
            DBMS_OUTPUT.put_line (
                   'Employee: '
                || l_data (i).emp_name
                || ' Join date is: '
                || l_data (i).emp_join_date
                || ' and Manager is: '
                || l_data (i).manager_name);
        END LOOP;
    END IF;
EXCEPTION
    WHEN OTHERS
    THEN
        DBMS_OUTPUT.put_line ('Exception when processing data: ' || SQLERRM);
END;
Corresponding Dbms_output is:

Employee: Mike Join date is: 31-JUL-18 and Manager is: Justin
Employee: Peter Join date is: 31-JUL-18 and Manager is: Justin
Employee: Jason Join date is: 31-JUL-18 and Manager is: Justin
Employee: Glenn Join date is: 31-JUL-18 and Manager is: Justin
Employee: Adam Join date is: 31-JUL-18 and Manager is: Justin
Employee: John Join date is: 27-AUG-18 and Manager is: Frank
Employee: Graeme Join date is: 17-AUG-18 and Manager is: Frank
Employee: Shawn Join date is: 07-AUG-18 and Manager is: Frank
Employee: Jonty Join date is: 28-JUL-18 and Manager is: Frank
Employee: DARELL Join date is: 28-JUL-18 and Manager is: Frank
FOR LOOP:
DECLARE
    CURSOR c_data
    IS
    SELECT emp_name, emp_join_date, manager_name
    FROM xx_test_cursor;
BEGIN
    FOR rec_data IN c_data
    LOOP
        DBMS_OUTPUT.put_line (
               'Employee: '
            || rec_data.emp_name
            || ' Join date is: '
            || rec_data.emp_join_date
            || ' and Manager is: '
            || rec_data.manager_name);
    END LOOP;
EXCEPTION
    WHEN OTHERS
    THEN
        DBMS_OUTPUT.put_line ('Exception when processing data: ' || SQLERRM);
END;
Corresponding dbms_output is:

Employee: Mike Join date is: 31-JUL-18 and Manager is: Justin
Employee: Peter Join date is: 31-JUL-18 and Manager is: Justin
Employee: Jason Join date is: 31-JUL-18 and Manager is: Justin
Employee: Glenn Join date is: 31-JUL-18 and Manager is: Justin
Employee: Adam Join date is: 31-JUL-18 and Manager is: Justin
Employee: John Join date is: 27-AUG-18 and Manager is: Frank
Employee: Graeme Join date is: 17-AUG-18 and Manager is: Frank
Employee: Shawn Join date is: 07-AUG-18 and Manager is: Frank
Employee: Jonty Join date is: 28-JUL-18 and Manager is: Frank
Employee: DARELL Join date is: 28-JUL-18 and Manager is: Frank
Warning: count(): Parameter must be an array or an object that implements Countable in /var/www/wp-content/themes/WpPremium/author.php on line 78
Cursors – Implicit Cursors
What are Cursors?
A cursor is a pointer to a private SQL area, temporarily allocated in the session’s User Global Area (UGA), that stores information about the processing of a SELECT statement or a DML statement (Insert, Update or Delete). In layman terms, a Cursor is used to fetch (SELECT) a particular dataset from a much larger dataset which can then be used for data manipulation using other DML Operations like Insert, Update or Delete.
There are two types of Cursors: Implicit Cursors and Explicit Cursors.
In this post, we will discuss mainly about Implicit Cursors.
Implicit Cursors: Whenever you execute a simple SELECT statement or a DML Statement like INSERT, UPDATE or DELETE statement, Oracle database creates an implicit cursor to process these statements. In such scenarios, Oracle opens a Cursor, fetches the row and then closes the Cursor after completing the sql operation. In Implicit cursors, the cursor life cycle is maintained by the Oracle Database.
Consider the following example. Create a table called xx_test_cursor and insert 4 records into that table. (below code).
CREATE TABLE xx_test_cursor
(
    emp_name         VARCHAR2 (200),
    emp_id           NUMBER,
    emp_join_date    DATE,
    manager_name     VARCHAR2 (200)
);

INSERT INTO xx_test_cursor
     VALUES ('John',1001,SYSDATE - 30, 'Frank');

INSERT INTO xx_test_cursor
     VALUES ('Graeme', 1002, SYSDATE - 40, 'Frank');

INSERT INTO xx_test_cursor
     VALUES ('Shawn', 1003, SYSDATE - 50, 'Frank');

INSERT INTO xx_test_cursor
     VALUES ('Jonty', 1004, SYSDATE - 60, 'Frank');

COMMIT;
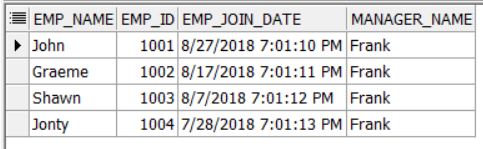
SELECT * FROM xx_test_cursor;
The select statement gives below result:
A sample example of an implicit cursor: SELECT INTO
DECLARE
    l_emp_name    xx_test_imp_cursor.emp_name%TYPE;
    l_join_date   xx_test_imp_cursor.emp_join_date%TYPE;
BEGIN
    SELECT emp_name, emp_join_date
      INTO l_emp_name, l_join_date
      FROM xx_test_imp_cursor
     WHERE manager_name = 'Frank'
       AND emp_id = 1001;

    DBMS_OUTPUT.put_line (
           'Emp Name is: '
        || l_emp_name
        || ' and Emp Join Date is: '
        || l_join_date);
EXCEPTION
    WHEN OTHERS
    THEN
        DBMS_OUTPUT.put_line ('Exception during fetching data: ' || SQLERRM);
END;
This gives the following result:

But, if the SELECT statement fetches more than 1 row in the dataset, then the program ends in exception. (in the code below I have commented the emp_id = 1001)
DECLARE
    l_emp_name    xx_test_cursor.emp_name%TYPE;
    l_join_date   xx_test_cursor.emp_join_date%TYPE;
BEGIN
    SELECT emp_name, emp_join_date
      INTO l_emp_name, l_join_date
      FROM xx_test_cursor
     WHERE manager_name = 'Frank';

    DBMS_OUTPUT.put_line (
           'Emp Name is: '
        || l_emp_name
        || ' and Emp Join Date is: '
        || l_join_date);
EXCEPTION
    WHEN OTHERS
    THEN
        DBMS_OUTPUT.put_line ('Exception during fetching data: ' || SQLERRM);
END;
And since this Select statement fetches more than 1 row, the code throws the following error:

Note: Actually Implicit Cursors are faster to process than an explicit cursor because there isn’t a separate step that declares, opens, fetches and closes the cursor.
Attributes of an Implicit Cursor: There are 4 important attributes of an Implicit Cursor:
- %FOUND – Until a DML statement like Insert, Update or Delete affects one or more rows, the SQL%FOUND will result as NULL The example below tries to update a record in the xx_test_cursor table. Only if the Update statement affects one or more rows, then the next statement in the IF condition is executed:
DECLARE
BEGIN
    UPDATE xx_test_cursor
       SET emp_name = emp_name || '_new'
     WHERE emp_id = 1001;

    IF SQL%FOUND
    THEN
        DBMS_OUTPUT.put_line ('SQL Found is True, thus executing the following statement..');
        INSERT INTO XX_TEST_CURSOR
             VALUES ('DARELL',
                     1005,
                     SYSDATE - 60,
                     'Frank');
        COMMIT;
    END IF;

EXCEPTION
    WHEN OTHERS
    THEN
        DBMS_OUTPUT.put_line ('Exception when processing data: ' || SQLERRM);
END;
- %ISOPEN – For Implicit Cursors, the database automatically closes the Cursor after executing the operation. Thus, the %ISOPEN always yields a FALSE for Implicit Cursors (because the Cursor is already closed). It is more useful for Explicit Cursors.
- %NOTFOUND – %NOTFOUND is opposite to the %FOUND attribute. This attribute checks if the corresponding DML Operation like Insert, Update or Delete modified any data in the table. If the SQL code did not update / insert / delete any data, then this attribute returns TRUE. Else if the SQL modifies any data, then it returns FALSE.
- In the example below – the UPDATE statement tries to update the table for a record that does not exist. Thus, no data was modified and the %NOTFOUND is true. And accordingly, the later INSERT statement works.
DECLARE
BEGIN
    UPDATE xx_test_cursor
       SET emp_name = emp_name || '_new'
     WHERE emp_id = 2006;

    IF SQL%NOTFOUND
    THEN
        DBMS_OUTPUT.put_line ('SQL%NOTFOUND is True, thus executing the following statement..');
        INSERT INTO XX_TEST_CURSOR
             VALUES ('SCOTT',
                     1006,
                     SYSDATE - 60,
                     'Frank');
        COMMIT;
    END IF;

EXCEPTION
    WHEN OTHERS
    THEN
        DBMS_OUTPUT.put_line ('Exception when processing data: ' || SQLERRM);
END;
- %ROWCOUNT – The %ROWCOUNT attribute returns the total number of records that got affected by the DML Operation.
- For example – in the code below – the test table has 1 record with emp_id = 1006. Thus, the delete statement deletes 1 record and the displays the same in the dbms_output.
DECLARE
BEGIN
DELETE FROM xx_test_cursor
WHERE emp_id = 1006;
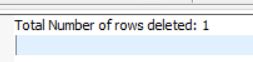
DBMS_OUTPUT.put_line ('Total Number of rows deleted: ' || SQL%ROWCOUNT);
EXCEPTION
WHEN OTHERS
THEN
DBMS_OUTPUT.put_line ('Exception when processing data: ' || SQLERRM);
END;
And the corresponding dbms_output displays as below:
Warning: count(): Parameter must be an array or an object that implements Countable in /var/www/wp-content/themes/WpPremium/author.php on line 78
How To: Create a Sales Order
In the Order to Cash (OTC) process in Oracle Applications, one of the first steps is to Create a Sales Order in Order Management Module.
The usual process of creating a Sales Order involves inserting data into an inbound staging table and then calling a Custom concurrent program. The detailed steps are as below:
- Insert data into staging tables.
- Validate data in the staging tables.
- Insert the validated data into Oracle Order Management Interface Tables.
- Run the Seeded Oracle “Order Import” Concurrent program to Create Sales Order.
These steps are explained as below:
- Insert data into staging tables: Basing on the source system, data is inserted into Custom staging tables via a middleware application like Webmethods or SOA.
- Validating Data in the staging tables: Some of the major validations that need to be done before inserting data into Interface tables are:
- Item Validation: The item that is being used on the Sales order need to be validated. The item has to exist in the Item Master as well should be assigned to the inventory org from where the Item is being shipped from.
SELECT *
  FROM mtl_system_items_b
 WHERE segment1 = 'TEST_ITEM_1234';
- Customer Validation: The Customer for which the order is being created for, should exist in the system already.
SELECT *
  FROM hz_cust_accounts
 WHERE account_number = '12345678'; -- p_customer_number
- Get BILL_TO Validation: For the Customer that exists, check to see if a valid BILL_TO Site exists.
SELECT hcsua.org_id, hcsua.site_use_id, hps.party_site_id FROM hz_cust_accounts hca ,hz_cust_acct_sites_all hcasa ,hz_cust_site_uses_all hcsua ,hz_party_sites hps WHERE hca.cust_account_id = hcasa.cust_account_id AND hcasa.cust_acct_site_id = hcsua.cust_acct_site_id AND hcasa.status = 'A' AND hcsua.status = 'A' AND hcasa.org_id = hcsua.org_id AND hcsua.site_use_code = 'BILL_TO' AND hps.identifying_address_flag = 'Y' AND hps.party_site_id = hcasa.party_site_id AND hca.cust_account_id = '&Cust_account_id' AND hcsua.org_id = '&Operating_unit_id' AND ROWNUM < 2; - GL_Period Validation: Validate whether the Order data has Open GL period or not.
SELECT gps.period_name, gps.set_of_books_id, gps.end_date, gps.closing_status FROM gl_periods gp, gl_period_statuses gps, gl_sets_of_books gsob, hr_operating_units hou WHERE gp.period_name = gps.period_name AND gp.period_set_name = gsob.period_set_name AND gsob.set_of_books_id = hou.set_of_books_id AND gps.application_id = 222 AND gps.set_of_books_id = gsob.set_of_books_id AND '&Order Date' BETWEEN gp.start_date AND gp.end_date AND hou.organization_id = '&Organization_id'; - UOM Code Validation: Validate Unit of Measure validation.
SELECT uom_code FROM mtl_units_of_measure_vl;
- Operating Unit Validation: Validate the Operating Unit for which the order is being created in.
SELECT organization_id
  FROM hr_operating_units
 WHERE name = ''
- Get Price List: Derive the Price List.
SELECT list_header_id, name FROM qp_list_headers qlh WHERE qlh.orig_org_id = '&Organization_id' AND currency_code = '&Currency_code' AND TRUNC (SYSDATE) BETWEEN NVL (TRUNC (qlh.start_date_active), TRUNC (SYSDATE) - 1) AND NVL (TRUNC (qlh.end_date_active), TRUNC (SYSDATE) + 1) AND qlh.active_flag = 'Y'; - Derive Tax Rate Code: Derive the tax rate code based on the tax code passed by the source system.
SELECT zrab.tax_regime_code,
       zrgb.tax_regime_id,
       zrab.tax,
       zrab.tax_status_code,
       zrab.tax_rate_code,
       zrab.tax_rate_id
  FROM zx_rates_b zrab, zx_regimes_b zrgb
 WHERE     zrab.tax_regime_code = zrgb.tax_regime_code
       AND TRUNC (SYSDATE) BETWEEN NVL (zrab.effective_from,
                                        TRUNC (SYSDATE) - 1)
                               AND NVL (zrab.effective_to,
                                        TRUNC (SYSDATE) + 1)
       AND zrab.active_flag = 'Y'                     -- Added for Defect#7614
       AND zrab.tax_rate_code = '&tax_rate_code';
- Item Validation: The item that is being used on the Sales order need to be validated. The item has to exist in the Item Master as well should be assigned to the inventory org from where the Item is being shipped from.
- Inserting Data into Interface Table: Upon Validation, Data is inserted into the following Order Interface Tables:
- Headers Interface: OE_HEADERS_IFACE_ALL.
- This is the Headers Interface table that captures all the data that goes into the Order Header data (later into OE_ORDER_HEADERS_ALL table). Some of the important columns to be populated are: Operation_code, order_number, orig_sys_document_ref, org_id, Ordered_date, order_type_id, sold_to_org_id, ship_from_org_id, invoice_to_org_id, booked_flag, change_sequence etc.
- Lines Interface: OE_LINES_IFACE_ALL
- This is the Lines Interface table that captures all the data that goes onto the Line Level on the Sales order (later onto the OE_ORDER_LINES_ALL table). Some of the important columns are: Org_id, orig_sys_document_ref, inventory_item_id (item), ordered_quantity, order_quantity_uom, unit_list_price, unit_selling_price, fulfillment_set_id etc.
- Payments Interface: OE_PAYMENTS_IFACE_ALL
- The Payments Interface table captures data that is shown later on the payments screen on the order. This table has the data that is later populated into OE_PAYMENTS table. Some important columns are: Payment_number, orig_sys_document_ref, orig_sys_payment_ref, payment_type_code, payment_amount, check_number, credit_card_number, credit_card_expiration_date etc.
- Actions Interface: OE_ACTIONS_IFACE_ALL
- The Actions interface table is used to load data that will perform any Action to be taken on the order once the order is created. Some uses include Cancelling a line, Applying Hold etc.. Some important columns are: Org_id, Hold_id, Hold_type_code, Operation_Code.
- Adjustment Interface: OE_PRICE_ADJS_IFACE_ALL
- The Adjustment interface table holds the data that later goes to the OE_Price_Adjustments table. This table is used to store price adjustments that have been applied to an order or a line.
- Headers Interface: OE_HEADERS_IFACE_ALL.
- Submit Order Import program: Once data is inserted into the above interface tables, the Seeded Oracle job – Order Import is submitted as a Concurrent program. The code to call the program is as below:
-
x_request_id :=
            fnd_request.submit_request (
               application   => 'ONT',
               program       => 'OEOIMP',
               description   => 'EBS Order Import',
               start_time    => SYSDATE,
               sub_request   => FALSE,
               argument1     => Operating Unit,
               argument2     => Order Source,
               argument3     => Orig Sys Doc Ref,
               argument4     => Operation Code,
               argument5     => Validate Only -- Yes or No,
               argument6     => Debug Level,   -- 1
               argument7     => Number of Instances,
               argument8     => Sold To Org ID,
               argument9     => Sold To Org,
               argument10    => Change Sequence,
               argument11    => Enable Single Line Queue for Instances,
               argument12    => Trim Trailing Blanks, --- Y
               argument13    => Process Orders With No Org Specified,
               argument14    => Default Operating Unit,
               argument15    =>  Validate DFFs ?     )
-
- Order Interface Errors: During importing the Orders from Interface tables to the Order base tables, if an error occurs due to a setup issue or a data issue, then the corresponding error messages are stored in OE_PROCESSING_MSGS_TL table.
SELECT OPT.* FROM OE_PROCESSING_MSGS OPM ,OE_PROCESSING_MSGS_TL OPT WHERE OPM.TRANSACTION_ID = OPT.TRANSACTION_ID AND ORIGINAL_SYS_DOCUMENT_REF = dof_ref; -- ORIGINAL_SYS_DOCUMENT_REF in headers interface - Oracle Base Tables: Upon completion of the “Order Import” seeded program, the base tables where order information is stored are:
- Header Data: OE_ORDER_HEADERS_ALL
- Lines Data: OE_ORDER_LINES_ALL
- Payments Data: OE_PAYMENTS
- Adjustments Data: OE_PRICE_ADJUSTMENTS
- Holds Data: OE_ORDER_HOLDS_ALL
- Order Sources: OE_ORDER_SOURCES
- Sets data – Arrival Set, Ship Set, Fulfillment Set: OE_SETS
- Transaction Types: OE_TRANSACTION_TYPES_TL.
Warning: count(): Parameter must be an array or an object that implements Countable in /var/www/wp-content/themes/WpPremium/author.php on line 78
Oracle Triggers
What are Triggers in Oracle?
Oracle Triggers are similar to PL/SQL Stored procedures that can be stored in the database and are explicitly fired whenever a table or a view is changed by a user action or a database system actions occur.
A trigger can be fired when one of the following happens on a table:
DML (Data Manipulation Language) statements like ‘Insert“, “Update” or “Delete” are run against the table.
DDL (Data Definition Language) statements like “Create“, “Alter” or “Drop” are issued either by a particular schema / user in the database.
Note: Using Triggers is effective to modify objects in the database, but they have to be used carefully. Excessive use of triggers may cause a SQL statement inside that trigger to fire other triggers – calling an effect called Cascading Triggers.
Parts of a Trigger:
- Triggering statement: A triggering statement is the SQL Statement or database event that causes a trigger to fire.
- Triggering Restriction: A trigger restriction results in a Boolean expression i.e. either a true or a false that specifies whether the trigger should fire or not. A trigger fires if the Triggering restriction results in “True“. A “False” or an “Unknown” result doesn’t fire a trigger.
- Trigger Action: A trigger action is the pl/sql statement (or anonymous block of code) that runs when the Triggering restriction results as True.
Example:
The following code is an example of a trigger that insert an Audit record into Table2 whenever an Insert event occurs into Table1.
Step 1: Create Table1 and Table2 for this test case.
CREATE TABLE table1
(
    col1    NUMBER
);

CREATE TABLE table2
(
    col1    DATE,
    col2    VARCHAR2 (2000)
);
Step 2: Create Trigger script.
CREATE TRIGGER tab1_trig
    AFTER INSERT
    ON table1
BEGIN
    INSERT INTO table2
         VALUES (SYSDATE, 'Insert into table1');
EXCEPTION WHEN OTHERS
THEN
   DBMS_OUTPUT.PUT_LINE ('Error During Trigger creation: )'||SQLERRM);
END;
Step 3: Generate the Triggering event.
INSERT INTO table1
     VALUES (1);
Step 4: Check the data in the Table 2.
SELECT * FROM table2;
Step 5: Result
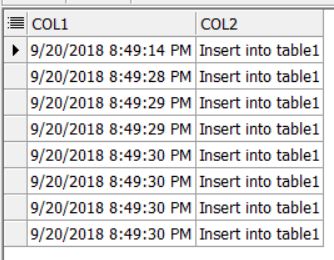
Explanation:
In the example above:
- The Triggering statement is: AFTER INSERT ON table1.
The trigger fires immediately after an insert operation occurs on the Table1.
- The Triggering Action is to Insert values in the Table2 when an Insert happens on Table1.
Different Types of Triggers
- Row Triggers:
- Statement Triggers:
- BEFORE and AFTER Triggers:
- INSTEAD OF Triggers:
Warning: count(): Parameter must be an array or an object that implements Countable in /var/www/wp-content/themes/WpPremium/author.php on line 78
How to delete a Value from a Valueset
Sometimes we create values inside valuesets that we may not need during code migration. As a developer, we might want to delete that value from that valueset during development, that way we are not migrating unnecessary information to higher instances.
Let’s create a test value set.
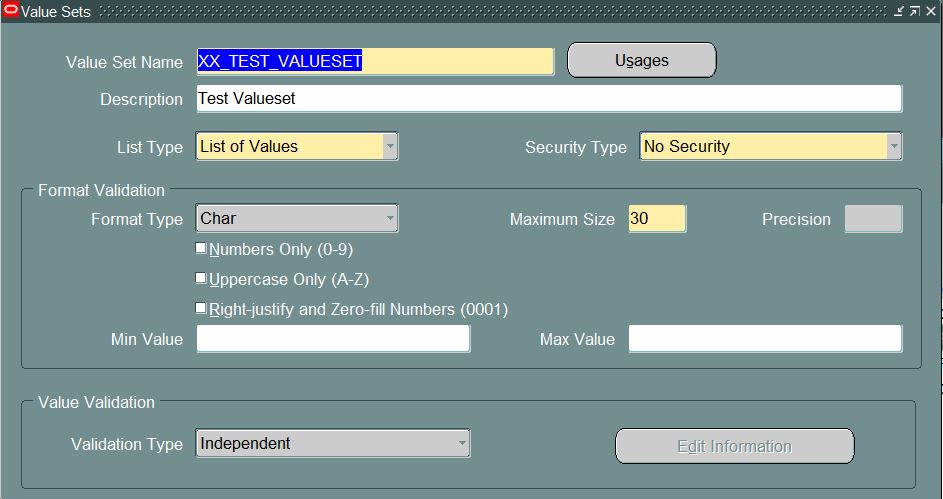
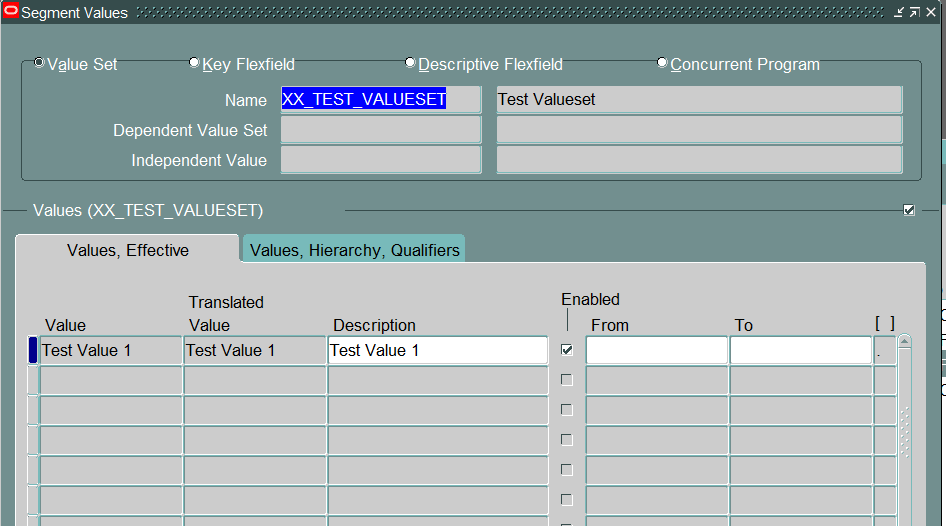
And create a couple of test values to the valueset.

SQL code to derive the values of the valueset from backend:
select *
from fnd_flex_values
where flex_value_set_id = (select flex_value_set_id from fnd_flex_value_sets
where flex_value_set_name = 'XX_TEST_VALUESET');
Now, below is the code to delete value from the valueset:
declare

l_flex_value_id  fnd_flex_values.flex_value_id%TYPE;
l_flex_value     fnd_flex_values.flex_value%TYPE;

begin

SELECT ffv.flex_value_id, ffv.flex_value
INTO   l_flex_value_id, l_flex_value
        FROM fnd_flex_value_sets ffvs,
             fnd_flex_values ffv,
             fnd_flex_values_tl ffvt
       WHERE     flex_value_set_name = 'XX_TEST_VALUESET' -- Value Set Name
             AND ffv.flex_value_set_id = ffvs.flex_value_set_id
             AND ffvt.flex_value_id = ffv.flex_value_id
             AND ffvs.flex_value_set_id = ffv.flex_value_set_id
             AND ffvt.language = 'US'
             AND ffv.enabled_flag = 'Y'
             AND ffv.summary_flag = 'N'
             and flex_value = 'Test Value 2';

      dbms_output.put_line ('l_flex_value_id is: '||l_flex_value_id||' and l_flex_value is :'||l_flex_value);

      fnd_flex_values_pkg.delete_row (l_flex_value_id);
      COMMIT;

      dbms_output.put_line (l_flex_value||' value deleted succesfully...');

exception when others
then

dbms_output.put_line ('Error during execution: '||SQLERRM);

end;
Valueset after the script is run:
Note: Make sure this script is used only in a development instance and not in any controlled instances. APPS access is required to run the above script. Please use it carefully.
Warning: count(): Parameter must be an array or an object that implements Countable in /var/www/wp-content/themes/WpPremium/author.php on line 78
Oracle apps order error interface table
During a Sales Order Creation scenario, when data is inserted into Interface table – sometimes Orders can fail to get created due to issues in the Interface table. The corresponding error information is stored in the oe_processing_msgs_tl table.
The query to find out error messages in the Order Interface table is:
SELECT *
FROM oe_processing_msgs opm,
     oe_processing_msgs_tl opmt
WHERE opm.transaction_id = opmt.transaction_id
AND opm.original_sys_document_ref = '123456';
--- where 123456 is the Order Number in the interface table.

--- Interface table information.

SELECT *
FROM oe_headers_iface_all
WHERE order_number = '123456';

SELECT *
FROM oe_lines_iface_all
WHERE orig_sys_document_ref = (SELECT orig_sys_document_ref
                               FROM oe_headers_iface_all
                               WHERE order_number = '123456');